
As I stood in my kitchen, the delightful aroma of panko breadcrumbs crisping in the skillet filled the air, whisking me away to the cozy ambiance of a restaurant. Today, I’m excited to share my version of Crusted Chicken Romano, an easy dish that’s become a staple in our home. This recipe is not just quick to prepare but also delivers comfort food vibes that leave everyone at the table craving more. With juicy chicken peeking through a golden, cheesy crust, each bite is pure satisfaction. Plus, there’s a gluten-free option for those who need it, ensuring that everyone can enjoy this family favorite. Ready to elevate your weeknight meals or impress guests without breaking a sweat? Let’s dive into this irresistible recipe!

Why is Crusted Chicken Romano a Must-Try?
Quick and Easy: From prep to plate, this recipe takes minimal time, making it perfect for busy evenings.
Golden Crunch: Enjoy a satisfying texture with a crispy panko crust that’s irresistible.
Flavor Explosion: The combination of Romano cheese and fresh lemon zest creates an unforgettable taste experience.
Family Favorite: It’s a crowd-pleaser, guaranteed to impress both guests and picky eaters alike.
Versatile Options: Need gluten-free? Simply swap in gluten-free flour and panko, and you’re all set!
Pair this delightful dish with a fresh salad or some garlic roasted asparagus for a well-rounded meal—you won’t regret trying this iconic Garlic Parmesan Chicken as a side dish!
Crusted Chicken Romano Ingredients
Here are the essential ingredients you’ll need to make this amazing dish!
For the Chicken
- Chicken Breasts – The main protein serving as the base; slice lengthwise for quicker cooking.
- Salt – Enhances flavor; adjust to your personal taste.
- Pepper – Adds seasoning; feel free to use fresh ground for more flavor.
For the Breading
- All-Purpose Flour – Coats chicken for breading; interchangeable with gluten-free flour for a Crusted Chicken Romano option.
- Large Egg – Binds the breading; ensure it’s beaten until smooth for even coverage.
- Panko Bread Crumbs – Provides that satisfying crispy texture; regular breadcrumbs can work if panko is unavailable.
- Grated Romano Cheese – Infuses the crust with a tangy, savory kick; substitute with Parmesan if desired.
For Flavor
- Fresh Parsley – Adds a vibrant touch and color; optional but highly recommended for presentation.
- Lemon Zest – Brightens up the dish with fresh citrus notes; use lemon juice if zest is not available.
For Frying
- Avocado Oil or Olive Oil – Ideal for frying; note that olive oil has a lower smoke point and is best for medium heat.
For Topping
- Shredded Mozzarella Cheese – Melts gloriously on top, offering creaminess; provolone can be a delightful alternative.
Gather these ingredients, and you’ll be well on your way to creating a comforting meal that captures the essence of home cooking!
Step‑by‑Step Instructions for Crusted Chicken Romano
Step 1: Prepare Chicken
Begin by slicing the chicken breasts lengthwise into cutlets to ensure even cooking. Use a meat mallet to pound them to about half an inch thick, creating uniform pieces that cook quickly. Season both sides generously with salt and pepper. This initial step sets the foundation for your delicious Crusted Chicken Romano.
Step 2: Set Up Breading Stations
Create a staged breading area with three shallow bowls. First, add all-purpose flour to one bowl. In the second bowl, beat a large egg until it’s smooth. For the third bowl, combine panko bread crumbs with grated Romano cheese, chopped fresh parsley, and lemon zest. This organized setup ensures an efficient and messy-free process when breading your chicken cutlets.
Step 3: Dredge Chicken
Take each cutlet and first coat it in the flour, ensuring it’s fully covered, then dip it into the beaten egg, allowing excess to drip off. Finally, press it into the panko mixture, covering it thoroughly for a crispy crust. This three-step dredging process is crucial in achieving the delightful texture of the Crusted Chicken Romano.
Step 4: Cook Chicken
In a large skillet, heat avocado oil over medium heat until shimmering, about 2-3 minutes. Carefully place each breaded cutlet in the skillet, avoiding overcrowding. Cook for 4-5 minutes on each side until golden brown and crispy. Keep an eye on the color; you want that beautiful golden hue to indicate perfect doneness.
Step 5: Melt Cheese
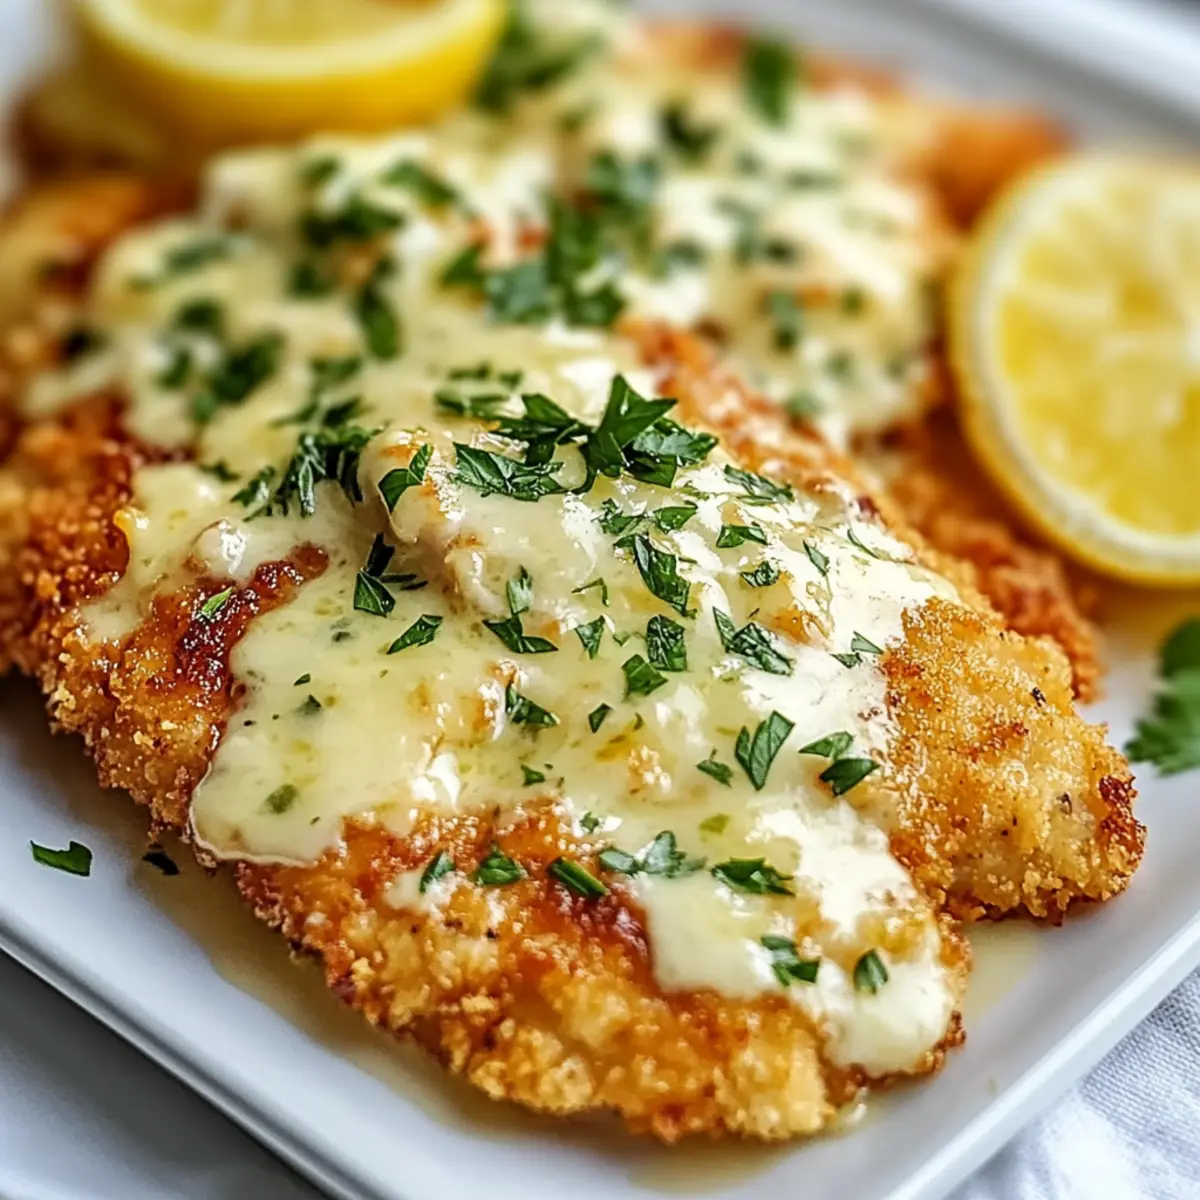
Once the chicken is beautifully golden, sprinkle shredded mozzarella cheese generously on top of each cutlet. Cover the skillet with a lid and let it cook for an additional 2-3 minutes, allowing the steam to melt the cheese thoroughly, creating a luscious topping that enhances the Crusted Chicken Romano.
Step 6: Serve
Remove the chicken from the skillet and let it rest for a minute. Garnish each piece with fresh parsley and serve with lemon wedges for an added zing. This final touch not only adds flavor but also elevates the presentation. Enjoy your homemade Crusted Chicken Romano, a dish that brings warmth and joy to any table!

Storage Tips for Crusted Chicken Romano
-
Room Temperature: It’s best to avoid leaving the Crusted Chicken Romano out at room temperature. If needed, it can be kept for up to 2 hours, but serve it hot for optimal taste.
-
Fridge: Store leftover Crusted Chicken Romano in an airtight container for up to 3 days. Ensure it’s covered well to maintain its moisture and prevent it from absorbing other odors.
-
Freezer: Freeze any leftover chicken in a tightly sealed container or freezer bags for up to 3 months. Lay a piece of parchment paper between layers to prevent sticking.
-
Reheating: For the best texture, reheat in the oven at 350°F (175°C) for about 15-20 minutes. This will help restore the crispiness of the crust while keeping the chicken juicy. Remember, a little patience in reheating goes a long way in keeping your Crusted Chicken Romano delicious!
Crusted Chicken Romano Variations & Substitutions
Feel free to get creative with this recipe and customize it to suit your tastes!
-
Juicy Thighs: Substitute chicken breasts for chicken thighs for a richer, more flavorful option that many love.
-
Gluten-Free Option: Replace all-purpose flour and panko with gluten-free flour and breadcrumbs, ensuring everyone can dig in!
-
Herbed Crust: Add Italian seasoning or your favorite herbs to the panko mix for an extra burst of flavor and aroma.
-
Spicy Flavor: Integrate chili flakes or cayenne pepper into the breadcrumb mixture for those who enjoy a fiery kick.
-
Vegetable Additions: Top with sautéed spinach, roasted red peppers, or even sun-dried tomatoes for vibrant flavor and nutrition.
-
Cheese Variations: Switch out grated Romano for Parmesan or a cheese blend to put your own twist on the classic taste.
-
Baked Version: For a lighter alternative, consider baking the chicken at 400°F (200°C) for 20-25 minutes instead of frying.
-
Lemon Zest Swap: If fresh lemon isn’t on hand, a splash of lemon juice can brighten the flavors just as well in the panko mixture.
Inspired yet? For an additional flavor ensemble, try serving with a delectable side like Garlic Parmesan Chicken or make it a feast with Chicken Etouffee to really impress your family and friends!
Make Ahead Options
Preparing your Crusted Chicken Romano ahead of time is a fantastic way to save time during busy weeknights! You can bread the chicken cutlets and refrigerate them for up to 24 hours, which allows the flavors to meld beautifully. Simply follow the dredging steps and store the coated cutlets in an airtight container or wrapped tightly in plastic wrap. To maintain that crispy texture, fry the chicken just before serving; heat oil in a skillet, cook the cutlets for 4-5 minutes per side until golden brown, then melt the mozzarella on top as instructed. This meal prep method ensures that your Crusted Chicken Romano remains just as delicious and satisfying for your family!
What to Serve with Crusted Chicken Romano
Pair this hearty chicken dish with delightful sides and drinks that enhance its savory charm and complete your meal experience.
-
Creamy Mashed Potatoes: Provides a smooth and buttery contrast to the crispy chicken, making each bite feel indulgent.
-
Garlic Roasted Asparagus: The fresh crunch of asparagus brightens the plate, adding a touch of elegance and vibrant flavor with every forkful.
-
Simple Green Salad: A light, tangy salad balances the richness of the chicken while introducing a refreshing crunch that complements the meal beautifully.
-
Herbed Couscous: Fluffy couscous is a lovely, light side that absorbs flavors well and adds a mild nuttiness, enhancing the overall dining experience.
-
Lemonade Spritzer: A refreshing drink with a zesty kick that mirrors the lemon notes in the chicken, quenching thirst while heightening the dish’s flavors.
-
Chocolate Mousse: End the meal on a sweet note with a light and airy dessert. Its richness balances the savory flavors of the chicken, leaving everyone satisfied.
Expert Tips for Crusted Chicken Romano
-
Oil Temperature: Ensure the oil is hot enough before adding the chicken; test with a drop of the panko mix for perfect crispiness.
-
Cooking Time: Don’t rush the cooking; 4-5 minutes per side ensures a golden-brown crust and juicy chicken inside.
-
Chicken Thickness: Pound the cutlets to an even thickness; this prevents any pieces from cooking unevenly and guarantees tenderness.
-
Breading Consistency: For an optimal crust, make sure each cutlet is thoroughly coated with flour, egg, and the panko mixture, avoiding bare spots.
-
Extra Flavor: Feel free to customize the panko mix with your favorite herbs or spices to give your Crusted Chicken Romano a personal twist!
Crusted Chicken Romano Recipe FAQs
How do I know if my chicken breasts are ripe for this recipe?
Absolutely! When selecting chicken breasts, look for ones that are firm to the touch and have a slightly pink color. Avoid any that are discolored or have dark spots, as they might be past their prime. Always check the expiration date if you’re purchasing pre-packaged chicken.
What is the best way to store leftover Crusted Chicken Romano?
Very! Store your leftover Crusted Chicken Romano in an airtight container and refrigerate it for up to 3 days. Ensure it’s well-sealed to retain moisture and prevent it from absorbing other odors in the fridge. When ready to enjoy, reheat it in the oven to keep that delightful crispiness!
Can I freeze Crusted Chicken Romano?
Absolutely! You can freeze cooked chicken cutlets for up to 3 months. First, let them cool completely, then wrap each piece in plastic wrap and place them in a sealed freezer bag or airtight container. To reheat, you can bake from frozen at 350°F (175°C) for about 20-25 minutes, allowing them to thaw and warm up.
Why is my panko breading falling off during cooking?
Don’t worry! If your breading is falling off, it may be due to not using enough egg to bind the coating or not pressing the panko mixture onto the chicken firmly enough. Make sure your cutlets are coated evenly in flour, dip them thoroughly in the beaten egg, and then press them into the panko blend. For extra adhesion, let them sit for a few minutes before frying.
Are there any dietary considerations I should be aware of?
Certainly! If you’re accommodating dietary restrictions, this recipe can easily be made gluten-free by substituting all-purpose flour and panko with gluten-free alternatives. It’s also a good idea to check for any specific personal allergies, especially to the cheeses being used. If cooking for pets, be cautious of ingredients like salt and cheese, which may not be suitable for them.
Can I prepare Crusted Chicken Romano ahead of time?
Very much so! You can bread the chicken cutlets a day in advance and refrigerate them, which helps the coating adhere better when you’re ready to cook. If you’d like, you can also fully cook the chicken ahead of time, then reheat it just before serving to keep it crispy and delicious. Enjoy the convenience of stress-free meal prep!

Crispy Crusted Chicken Romano for Cozy Home Cooking
Ingredients
Equipment
Method
- Begin by slicing the chicken breasts lengthwise into cutlets and pound them to about half an inch thick. Season both sides with salt and pepper.
- Set up three shallow bowls: one with flour, one with beaten egg, and one with panko mixed with Romano cheese, parsley, and lemon zest.
- Dredge each cutlet in flour, dip in egg, and coat fully with the panko mixture.
- Heat avocado oil in a skillet over medium heat until shimmering. Cook each cutlet for 4-5 minutes per side until golden brown.
- Sprinkle mozzarella cheese generously on top of each cutlet and cover the skillet to let the cheese melt for additional 2-3 minutes.
- Remove from skillet and let rest for a minute. Garnish with fresh parsley and serve with lemon wedges.
Leave a Reply