
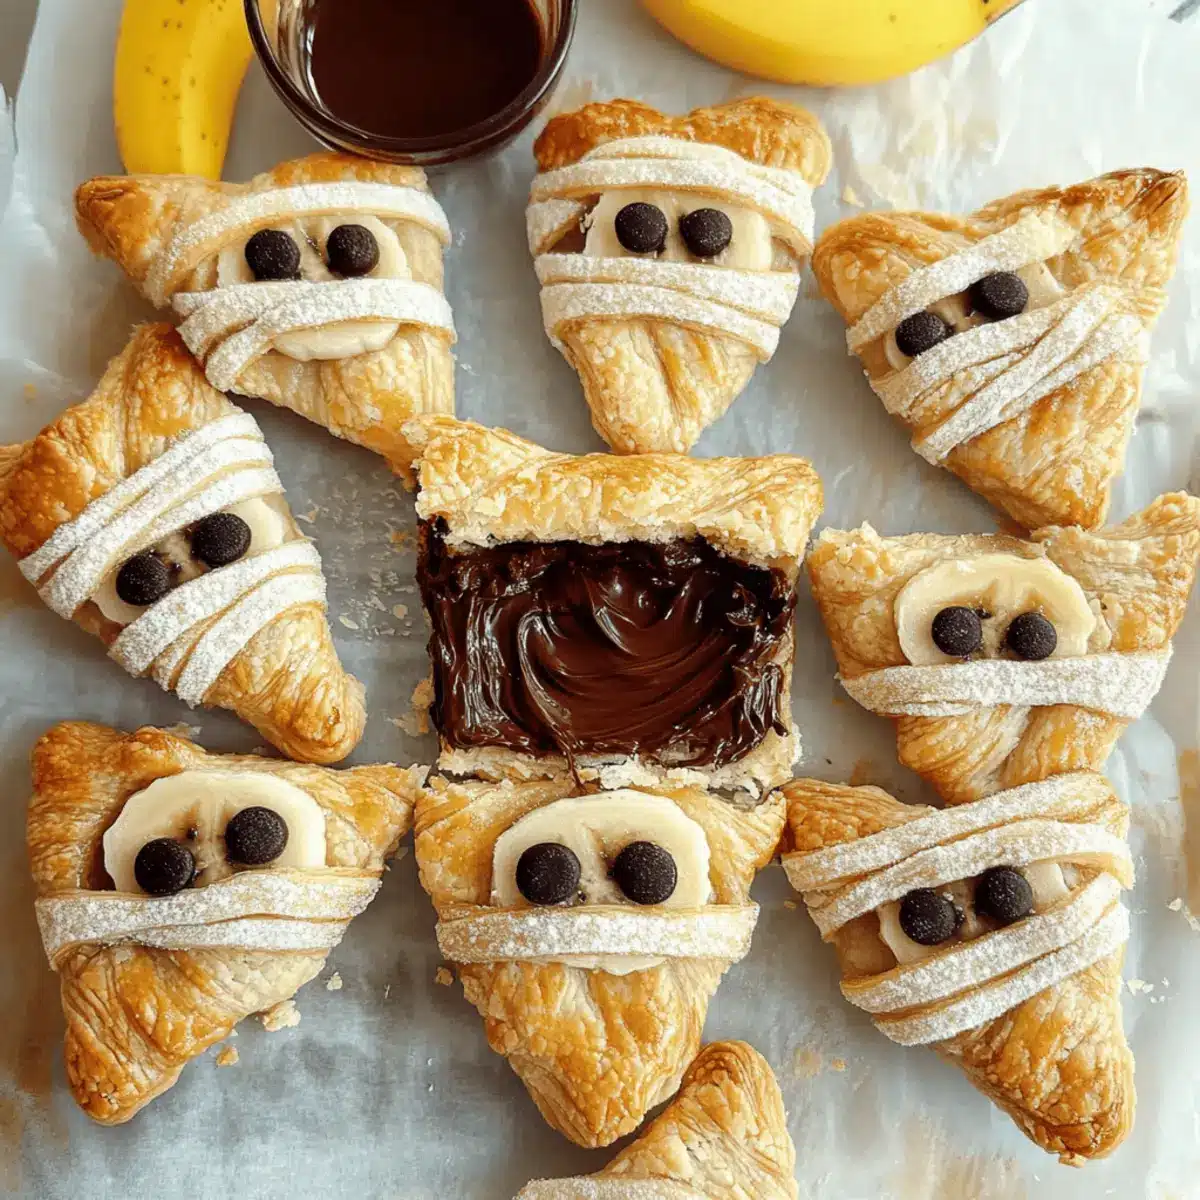
As I sifted through my Halloween stash this year, I stumbled upon a jar of creamy vegan Nutella, and a little culinary spark ignited within me. Combining it with soft bananas and encasing everything in flaky puff pastry led me to create these delightful Nutella Mummy Hand Pies. Perfectly crafted for a festive touch, these treats can effortlessly become the star of your Halloween gathering. With just four simple ingredients and only about 30 minutes of prep time, they are not only a breeze to make but 100% vegan and gluten-free! Whether you’re looking to impress guests or simply satisfy your sweet tooth, these hand pies promise to deliver a spooktacular experience. How will you decorate these adorable little mummies to unleash their festive spirit?
Why Are Nutella Mummy Hand Pies Special?
Easy to Make: With just four ingredients and 30 minutes of prep time, even novice bakers can whip up these adorable treats.
Vegan and Gluten-Free: Suitable for various dietary needs, these hand pies ensure everyone can indulge without worry.
Delightful Flavor Combination: The rich chocolate-hazelnut spread complemented by sweet bananas creates a flavor explosion that’ll satisfy any sweet tooth.
Perfect for Halloween: Their spooky mummy appearance adds the perfect festive touch to Halloween celebrations, making them a crowd favorite!
Versatile Filling: Feel free to swap out Nutella for other nut butters or even seasonal pumpkin puree for a unique twist.
Serve Warm or Cold: Enjoy them fresh out of the oven or save them for later snacks; they maintain their deliciousness!
For additional inspiration, check out my tips on creating stunning seasonal treats with flair in my Halloween recipe collection.
Nutella Mummy Hand Pie Ingredients
• Quick Note: Gather these simple ingredients for a festive treat that everyone will love!
For the Pastry
- Ready Roll Puff Pastry – A flaky base that makes these hand pies irresistible; opt for vegan & gluten-free varieties to cater to dietary needs.
- Dairy-Free Milk – Brush the pastry with any plant-based milk for that golden finish.
For the Filling
- Vegan Nutella – The star filling that adds a rich, chocolaty flavor; for a healthier twist, try homemade nut butter.
- Bananas – Adds natural sweetness and creaminess to your pies; feel free to substitute with apple slices for a delightful change.
For Decoration
- Googly Eyes – These playful eyes will bring your mummies to life!
- Dairy-Free White Chocolate Buttons – Great for creating the eyes; melted dairy-free chocolate can serve as an alternative.
- Caster/Granulated Sugar – Optional for a sweet sprinkle on top, enhancing both flavor and color.
- Icing Sugar – Dust the finished pies for a charming presentation; this step is optional but adds a lovely touch.
Step‑by‑Step Instructions for Nutella Mummy Hand Pies
Step 1: Preheat and Prepare Baking Trays
Begin by preheating your oven to 180°C (350°F). While the oven warms up, line two baking trays with grease-proof paper to prevent sticking. This will create a perfect base for your Nutella Mummy Hand Pies, ensuring they bake evenly and release effortlessly once they’re golden and flaky.
Step 2: Roll Out Pastry and Cut Shapes
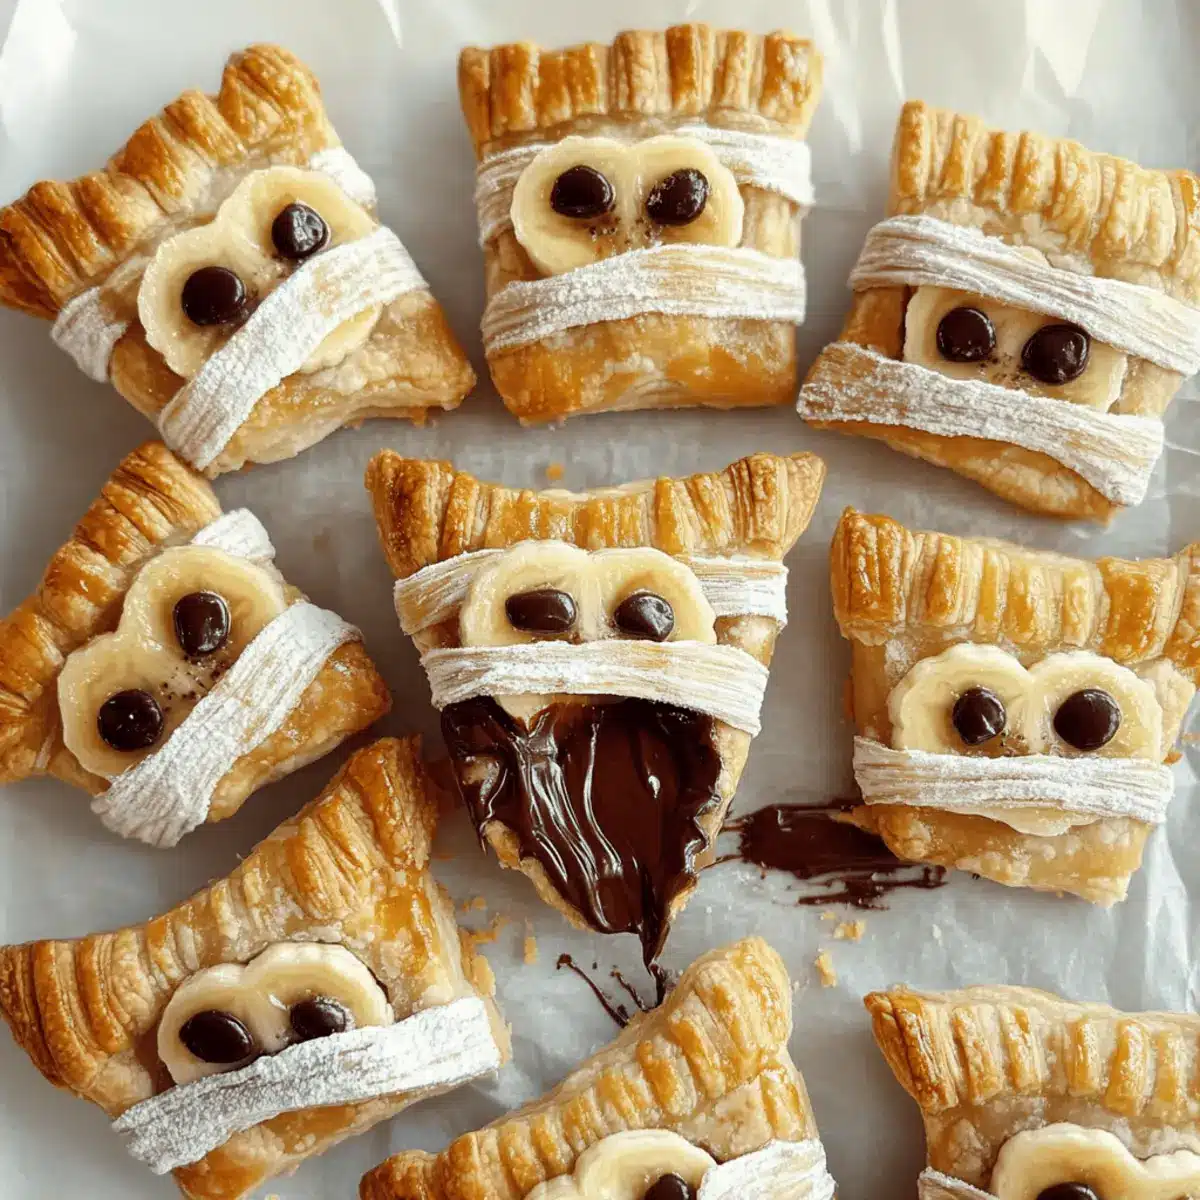
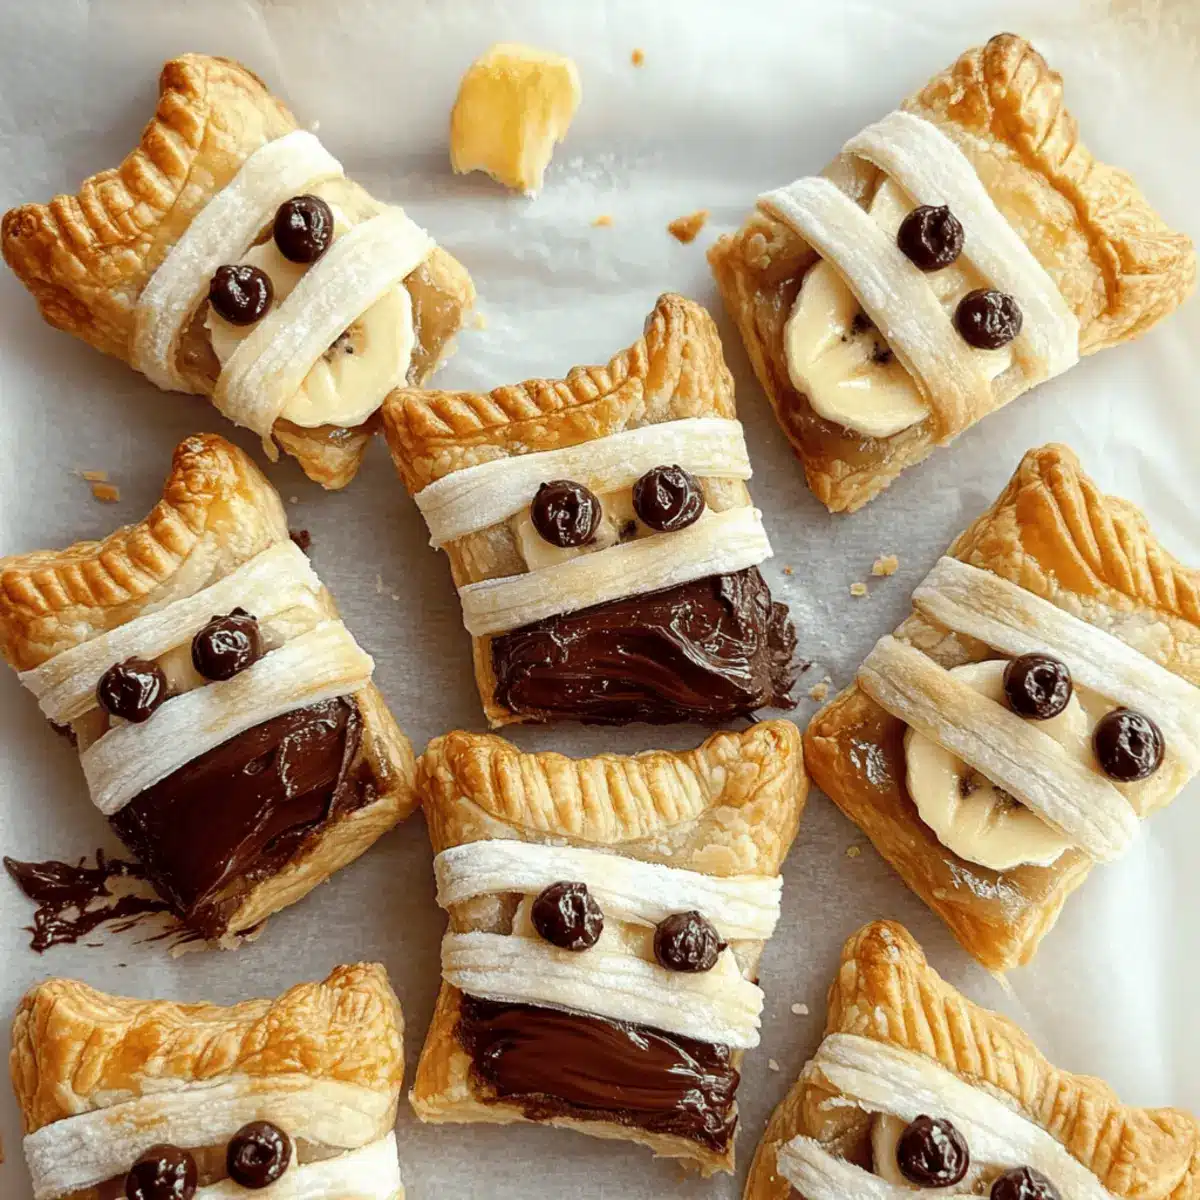
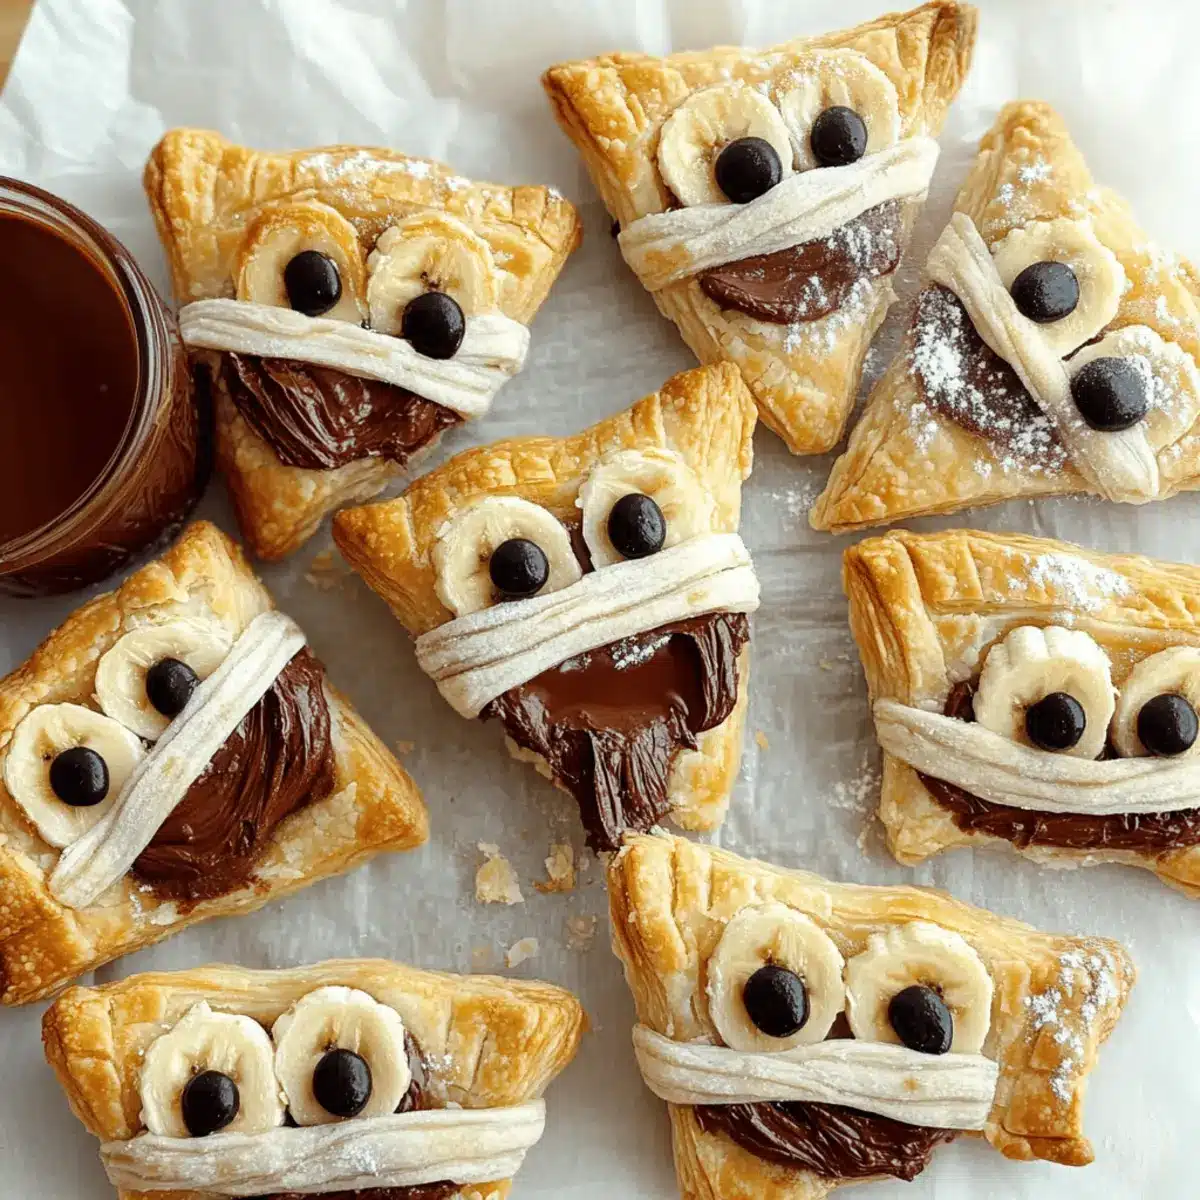
Unroll your ready-roll puff pastry sheets on a clean surface, smoothing out any wrinkles with a rolling pin. Cut the pastry into rectangles approximately 4 x 2.5 inches, and set aside some thin strips for the mummy wraps. These shapes will form the delicious pockets for your rich chocolatey filling and add charm to your Halloween theme.
Step 3: Chill Pastry for Better Handling
Once you have your rectangles cut, place them in the refrigerator for about 5 minutes. Chilling the pastry will make it easier to handle, ensuring it maintains its shape while you fill and assemble your Nutella Mummy Hand Pies. This step is crucial for achieving that superb, flaky texture we all love!
Step 4: Add the Nutella and Bananas
After chilling, take your pastry rectangles out and pipe or spread a generous layer of vegan Nutella in the center of each piece. Top the Nutella with slices of ripe banana for added sweetness and creaminess. Be sure to leave enough space around the edges, as this will help seal the pies and avoid any oozing during baking.
Step 5: Seal the Filling with Dairy-Free Milk
Brush the edges of each pastry rectangle with a small amount of dairy-free milk to help seal them shut. Carefully fold the pastry over the filling, pressing the edges together firmly to ensure a secure seal. This step is vital to keep your delicious Nutella and banana filling enclosed while baking.
Step 6: Create the Mummy Effect
Lay the thin pastry strips over each filled pie in a zig-zag pattern to create the mummy look. Press down gently to secure the strips, making sure not to squash the filling. This playful design will let your Nutella Mummy Hand Pies come alive, perfectly suited for festive Halloween fun.
Step 7: Brush and Sprinkle for Extra Crispiness
Using a pastry brush, coat the top of your assembled hand pies with more dairy-free milk. Optional: for a little extra sweetness and visual appeal, sprinkle caster or granulated sugar on top. This simple technique will give your Nutella Mummy Hand Pies a delightful golden finish as they bake.
Step 8: Bake to Golden Perfection
Place the trays in the preheated oven and bake for about 15-18 minutes, keeping an eye on them until they puff up nicely and turn golden brown. The enticing aroma of baking pastry and rich Nutella will fill your kitchen, signaling that Halloween treats are nearly ready to be devoured!
Step 9: Cool and Decorate
After baking, let your Nutella Mummy Hand Pies cool on the trays for a few minutes before transferring them to a wire rack. If desired, decorate the cooled pies by adding googly eyes using dairy-free white chocolate buttons. This final touch brings your spooky creations to life and adds a fun twist to your Halloween celebrations.
Make Ahead Options
These Nutella Mummy Hand Pies are perfect for meal prep, making them a delightful option for busy weeknights or Halloween parties. You can prepare the pastry filled with vegan Nutella and banana slices up to 24 hours in advance—just be sure to keep them covered in the refrigerator to maintain their freshness and prevent drying out. When you’re ready to serve, simply brush them with dairy-free milk and bake for 15-18 minutes until golden brown. This way, you’ll save time without sacrificing quality, ensuring each bite remains as delicious as if they were fresh out of the oven!
What to Serve with Nutella Mummy Hand Pies
Elevate your Halloween festivities with delightful sides and treats that perfectly complement these gooey, chocolatey hand pies.
- Crispy Apple Slices: Fresh and juicy, they balance the rich sweetness of Nutella and add a refreshing crunch to your dessert spread.
- Pumpkin Spice Latte: Warm and cozy, this seasonal drink matches the festive spirit and rich flavors, making it a perfect pairing.
- Coconut Whipped Cream: Light and fluffy, this dairy-free option enhances the pies while adding a tropical twist that’s irresistible and creamy.
- Spooky Fruit Skewers: Thread berries and banana slices onto sticks for a fun, colorful addition that adds freshness alongside the richness of the pies.
- Caramel Sauce Dip: A sweet and gooey dip to drizzle or dunk into, creating an explosion of flavor that complements the Nutella filling beautifully.
- Halloween-Themed Punch: A fruity, fizzy drink with floating orange slices and spooky ice cubes to create a festive atmosphere with every sip.
- Chilled Vegan Ice Cream: Serve alongside these pies for a creamy, dreamy blend of textures—perfectly indulgent for the sweet-toothed crowd.
- Chocolate-Covered Pretzels: Their salty crunch pairs wonderfully, offering a delightful contrast to the sweet, soft hand pies that are sure to impress.
- Spiced Nuts: For something savory, roasted spiced nuts offer a crunchy texture and robust flavor, balancing the sweetness in a satisfying way.
- Roasted Pumpkin Seeds: Lightly salted with a hint of spice, they add a seasonal touch that ties in perfectly with your Halloween theme.
Expert Tips for Nutella Mummy Hand Pies
- Cool Filling: Let your Nutella and banana filling cool slightly before sealing to prevent the pastry from becoming soggy.
- Seal Properly: Make sure to press the edges well after brushing with dairy-free milk; this prevents the filling from oozing out during baking.
- Puff Pastry Choices: Opt for vegan and gluten-free puff pastry to accommodate dietary preferences and ensure everyone can enjoy these Nutella Mummy Hand Pies.
- Even Baking: Bake one tray at a time to allow your hand pies to puff up evenly, resulting in a better final texture.
- Decorate Creatively: Get creative with your decorating—try different shapes, colors, or fillings to make your spooky treats even more festive!
Storage Tips for Nutella Mummy Hand Pies
Fridge: Store your Nutella Mummy Hand Pies in an airtight container in the fridge for up to 2 days to keep them fresh and delicious.
Freezer: To enjoy these delightful treats later, freeze the baked hand pies on a baking sheet for about an hour before transferring them to a freezer-safe container. They can be stored for up to 3 months.
Reheating: Reheat from frozen in the oven at 180°C (350°F) for about 15-20 minutes or until warmed through and crisp again. Enjoy them fresh for a delightful snack!
Nutella Mummy Hand Pies: Customization Ideas
Let your imagination run wild as you explore these delightful variations for your Nutella Mummy Hand Pies, making them truly your own!
-
Nut Butter Swap: Use almond or peanut butter instead of Nutella for a different flavor experience. This simple switch creates a nutty delight that both kids and adults will love!
-
Pumpkin Puree Surprise: Replace bananas with pumpkin puree for a festive fall twist. This variation adds a seasonal flair, perfect for Halloween parties or cozy autumn gatherings.
-
Mini Mummies: Create bite-sized hand pies by cutting the pastry into smaller shapes. These mini delights are perfect for sharing and make adorable additions to any dessert platter!
-
Fruity Fillings: Substitute bananas with apple or pear slices for added freshness. The crispy tartness pairs beautifully with the sweet and chocolaty filling, introducing a delightful texture to every bite.
-
Spicy Kick: Add a pinch of cinnamon or a dash of cayenne pepper to the Nutella for a spicy flavor twist. This unexpected kick transforms a classic treat into an exciting culinary adventure!
-
Chocolate Drizzle: Elevate the presentation with a drizzle of melted dairy-free chocolate over the mummy hand pies. This decadent touch not only enhances the taste but looks stunning too!
-
Mix and Match Toppings: Get creative with your decorations! Use colored icing or sprinkles for eyes to create a fun and spooky look that the little goblins will enjoy.
-
Coconut Flakes: For a textured twist, sprinkle unsweetened coconut flakes on top before baking. The toasted coconut will add a lovely crunch and a hint of tropical sweetness.
If you’re excited to explore more themed treats, check out my Halloween recipe collection for more inspiration!
Nutella Mummy Hand Pies Recipe FAQs
How do I choose the right puff pastry?
Absolutely! When selecting your puff pastry for Nutella Mummy Hand Pies, look for packages that specify vegan and gluten-free options. Make sure there are no dark spots or tears in the pastry, as this could affect the flaky texture. Brands like [insert popular vegan brand] are often reliable for these dietary needs.
How do I store leftover hand pies?
Very simple! Place your Nutella Mummy Hand Pies in an airtight container and store them in the fridge for up to 2 days. If you want to keep them fresh longer, you can store them in the freezer. Place them in a freezer-safe container after they cool completely, and they can last for up to 3 months!
Can I freeze Nutella Mummy Hand Pies?
Of course! To freeze, first bake your hand pies as instructed. Once they have cooled, place them on a baking sheet and put them in the freezer for about an hour until firm. After that, transfer them to a freezer-safe container. When you’re ready to enjoy them, reheat from frozen at 180°C (350°F) for about 15-20 minutes until warm and crispy.
What if my filling oozes out during baking?
Oh no! To avoid that delightful filling from oozing, ensure you’re not overfilling each pastry rectangle. Only a tablespoon of Nutella and a few thin banana slices should do. Also, press the edges firmly after brushing with dairy-free milk to create a secure seal.
Are these hand pies suitable for allergies?
Very much so! Nutella Mummy Hand Pies can be made completely vegan, gluten-free, and dairy-free. They are perfect for those with dietary restrictions. Just double-check your specific ingredients, like puff pastry and vegan Nutella, to ensure they don’t contain allergens for your guests.
How can I decorate my mummies creatively?
Get as creative as you like! You can use melted dairy-free chocolate to create fun designs or sprinkle colorful edible glitter for a spooky touch. I often add fun sprinkles or use different shaped eyes to give the mummies personality—let your imagination run wild!
Nutella Mummy Hand Pies: Spooky Treats for Halloween Fun
Ingredients
Equipment
Method
- Preheat the oven to 180°C (350°F) and line two baking trays with grease-proof paper.
- Unroll puff pastry and cut into rectangles, setting aside some strips for mummy wraps.
- Chill pastry rectangles in the refrigerator for about 5 minutes.
- Add a layer of vegan Nutella and slices of banana onto the pastry rectangles.
- Brush the edges with dairy-free milk and fold over to seal.
- Create a mummy effect with pastry strips laid over the pies.
- Brush tops with dairy-free milk and sprinkle with sugar if desired.
- Bake for 15-18 minutes until golden brown.
- Let cool and decorate with googly eyes.
Leave a Reply