
The warm aroma of freshly baked cupcakes wafted through my kitchen, instantly transforming the room into a cozy holiday haven. I have to share my new favorite, gluten-free hot chocolate cupcakes, which perfectly capture those classic winter vibes. These delightful treats are not only easy to whip up, but they offer the indulgence of a gooey chocolate center and a luscious dairy-free buttercream that everyone will adore. Whether you’re planning a festive gathering or simply craving something sweet, these cupcakes are the answer. So, are you ready to elevate your dessert game and astonish your guests with these irresistible, gluten-free goodies?
Why Are These Cupcakes a Must-Try?
Irresistible Flavor: The rich chocolate base, combined with a gooey center, mimics that classic hot cocoa taste we all know and love.
Dairy-Free Delight: This recipe ensures everyone can join in the fun, making it perfect for gatherings where dietary restrictions matter.
Quick and Easy: With simple ingredients and straightforward steps, you can whip these up in no time—ideal for last-minute holiday treats.
Festive Appeal: Topped with mini marshmallows and a fluffy buttercream, these cupcakes are not just a dessert but a delightful centerpiece for your holiday table.
Versatile Options: Feel free to switch things up! Add peppermint extract for a holiday twist, or substitute chocolate spread with caramel for a new flavor sensation. If you’re also looking for other tasty ideas, don’t miss my Peach Bellini Cupcakes for another crowd-pleaser!
Gluten-Free Hot Chocolate Cupcake Ingredients
-
For the Cupcakes
• Granulated Sugar – Provides sweetness and moisture; substitute with coconut sugar for a lower glycemic index alternative.
• Gluten-Free Flour Blend – Acts as the main structure; make sure it includes xanthan gum for best results.
• Cocoa Powder – Delivers rich chocolate flavor; sift before using to ensure a smooth batter.
• Baking Powder – Acts as a leavening agent; confirm it’s gluten-free for proper rising.
• Xanthan Gum – Optional, but helps mimic traditional gluten texture; omit if your flour blend already has it.
• Dairy-Free Milk – Adds moisture to the batter; regular milk can be used if dairy isn’t a concern.
• Eggs – Provide structure and moisture; for a vegan twist, use flax eggs instead.
• Vanilla Extract – Enhances overall flavor; opt for pure vanilla for the best taste.
• Melted Dairy-Free Butter – Keeps the cupcakes moist; substitute with regular butter if desired.
• Hot Coffee – Intensifies the chocolate flavor without adding coffee taste; wonderful for richness! -
For the Frosting
• Dairy-Free Butter – Creates light, fluffy frosting; ensure it’s softened, not melted.
• Icing Sugar – Sweetens and thickens the frosting; add gradually to prevent a powdered sugar cloud. -
For the Center and Topping
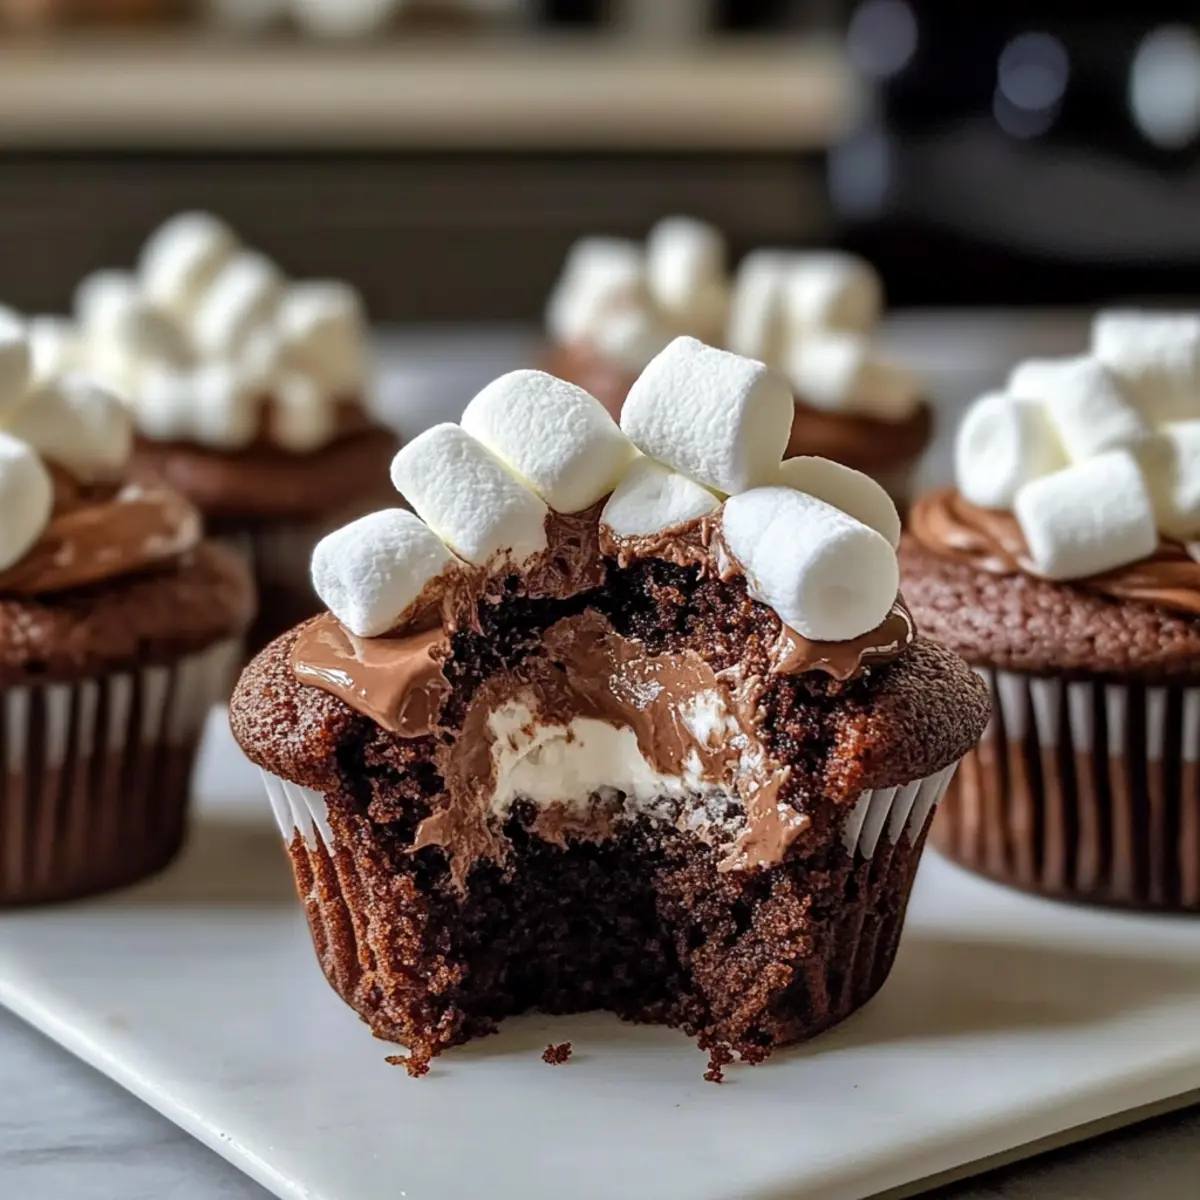
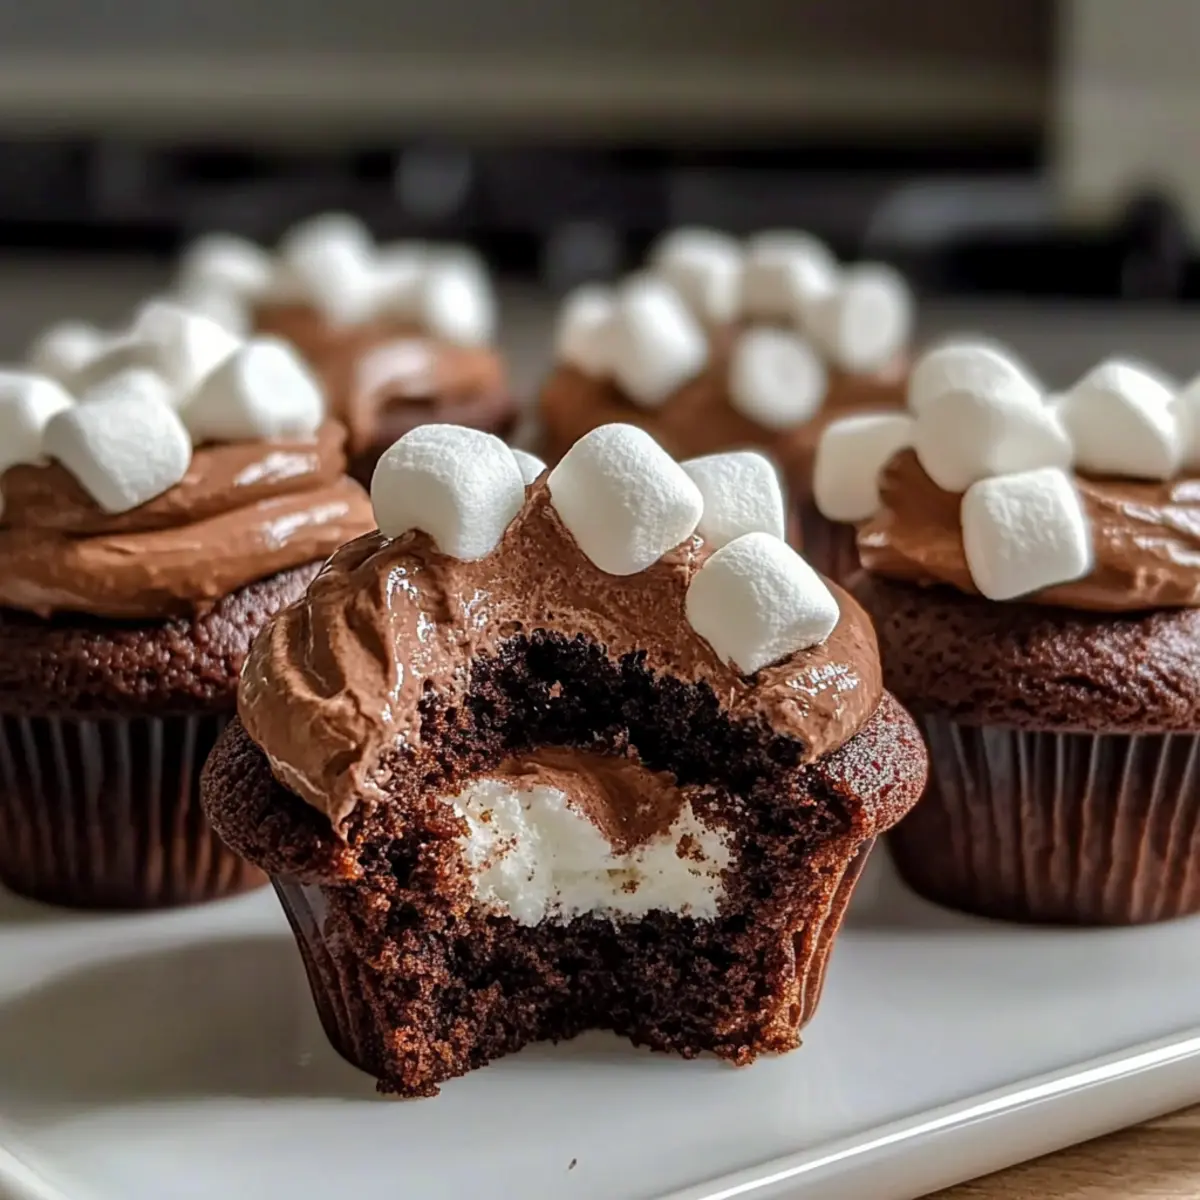
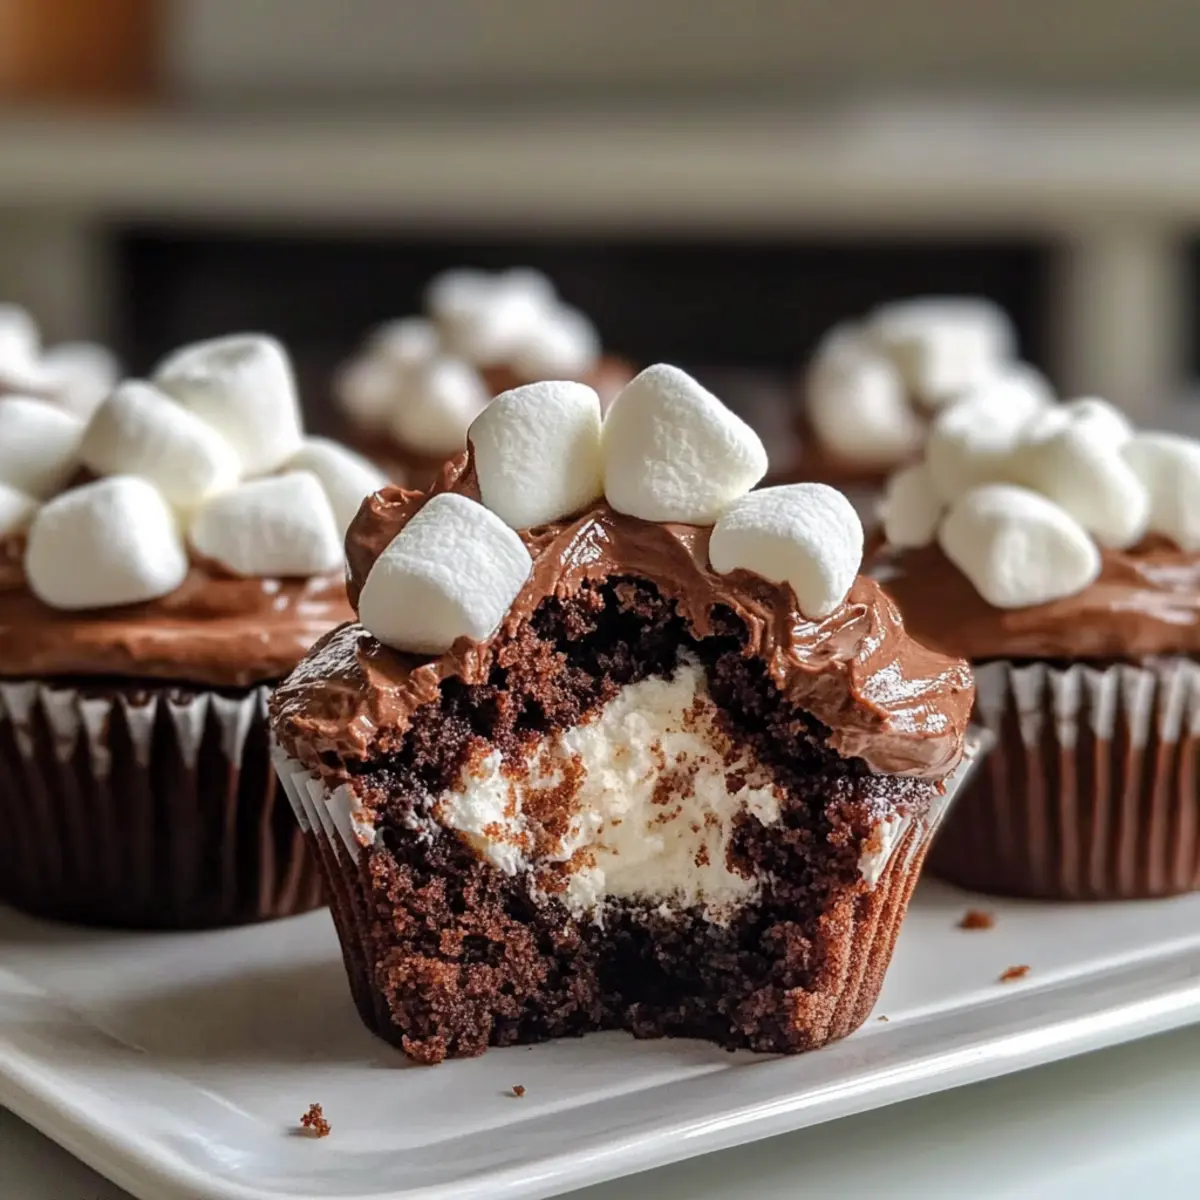
• Mini Marshmallows – Decorative and adds that classic hot chocolate flair; a delightful finishing touch!
• Chocolate Spread – Added for a gooey center; choose a dairy-free brand for the ultimate indulgence.
Step‑by‑Step Instructions for Gluten-Free Hot Chocolate Cupcakes
Step 1: Preheat the Oven
Begin by preheating your oven to 180°C (350°F). While it’s heating up, line your muffin tin with colorful cupcake liners. This will prepare your baking setup and get your space in the festive spirit, ensuring these gluten-free hot chocolate cupcakes will have a cozy home while baking.
Step 2: Mix Dry Ingredients
In a large mixing bowl, whisk together the granulated sugar, gluten-free flour blend, baking powder, cocoa powder (sifted), and xanthan gum (if using). Aim for a consistent mixture that’s free of lumps. This crucial step helps build the airy structure of your cupcakes, allowing them to rise beautifully in the oven.
Step 3: Combine Wet Ingredients
In a separate bowl, whisk together the dairy-free milk, eggs (or flax eggs), vanilla extract, and melted dairy-free butter until everything is smoothly combined. This mixture should be creamy and uniform, bringing together the moistness needed for your gluten-free hot chocolate cupcakes while also enhancing the rich flavor profile.
Step 4: Combine Dry and Wet Mixtures
Gently fold the wet mixture into the dry ingredients, being careful not to overmix. Once blended, slowly stir in the hot coffee to create a thin batter that glistens with chocolatey goodness. The coffee is key here, amplifying the rich cocoa flavor without leaving a coffee taste, ensuring a delightful experience.
Step 5: Fill the Cupcake Liners
Carefully divide the cupcake batter evenly among your prepared liners, filling each about three-quarters full. This allows room for the cupcakes to rise and puff up perfectly in the oven without spilling over. With that, it’s time to bake these delightful bites of heaven.
Step 6: Bake the Cupcakes
Slide the muffin tin into the preheated oven and bake for 20 minutes. Be patient during this time; resist the urge to open the oven door as it could cause the cupcakes to deflate. You’ll know they’re done when they spring back slightly when touched and a toothpick inserted in the center comes out with a few moist crumbs.
Step 7: Cool the Cupcakes
Once baked, remove the cupcakes from the oven and let them cool in the tin for about 10 minutes. Then, transfer them to a wire rack to cool completely. This step is essential, as cooling allows the cupcakes to set and maintain their structure, ensuring a delicious texture for your gluten-free hot chocolate cupcakes.
Step 8: Prepare the Frosting
While the cupcakes cool, prepare the frosting by beating the softened dairy-free butter in a bowl until light and fluffy, about 2-3 minutes. Gradually add the icing sugar and a splash of dairy-free milk until you achieve a smooth, pipeable consistency. Beat well for an additional 5 minutes to ensure the frosting is airy and luscious.
Step 9: Fill and Frost the Cupcakes
Once the cupcakes are completely cool, using a small knife, cut a well into the center of each cupcake and fill it with your chosen chocolate spread. Pipe or spread the creamy buttercream on top, creating a beautiful swirl. Finally, garnish with mini marshmallows and a dusting of cocoa powder for an extra festive touch.
How to Store and Freeze Gluten-Free Hot Chocolate Cupcakes
Room Temperature: Keep cupcakes in an airtight container at room temperature for up to 3 days. This keeps them fresh and moist, ready to indulge guests or family.
Fridge: If you prefer, store the cupcakes in the fridge for up to 5 days. Make sure they’re covered to prevent them from drying out.
Freezer: For longer storage, freeze unfrosted cupcakes for up to a month. Wrap them tightly in plastic wrap and then place in a freezer-safe bag to maintain texture.
Reheating: When ready to enjoy, thaw cupcakes at room temperature for a couple of hours or microwave briefly to warm. Then, frost them and revive that delightful gooey center!
What to Serve with Gluten-Free Hot Chocolate Cupcakes
When you’re celebrating the season with these decadent cupcakes, the right pairings can elevate your festive feast to the next level.
- Rich Hot Cocoa: A warm cup of hot cocoa enhances the chocolate experience, making it feel like a cozy winter hug.
- Vanilla Ice Cream: The creamy, cool flavor of vanilla ice cream complements the rich chocolate and balances the sweetness—perfect for those who need a cooling contrast!
Treat your guests to a delightful topping of shaved chocolate or a sprinkle of festive spices on the ice cream to add a seasonal touch.
- Fruit Salad: A refreshing mix of berries and citrus brightens the palette, providing a contrasting freshness that works beautifully against the indulgent cupcakes.
- Nuts & Dried Fruit Platter: Mingle some warm roasted nuts and sweet dried fruits for a nutty, chewy accompaniment that adds texture to your dessert spread.
This crunchy ensemble serves as a delightful snack between sips of cocoa and bites of chocolate goodness.
- Christmas Punch: A fruity, vibrant punch with festive spices creates a fun, celebratory vibe that pairs beautifully with the sweet richness of the cupcakes.
- Peppermint Bark: This chocolatey, minty treat offers a classic holiday flavor that aligns perfectly with the essence of hot chocolate, while adding a delightful crunch.
These thoughtful pairings transform your gathering into a memorable feast, celebrating the warmth and joy of the season!
Gluten-Free Hot Chocolate Cupcake Variations
Customize your gluten-free hot chocolate cupcakes to fit your taste and dietary needs—let your creativity shine through!
-
Dairy-Free Option: Use coconut or almond milk for the moistness but maintain the creamy texture you love.
-
Sweetener Swap: Opt for maple syrup instead of granulated sugar for a natural sweetness with a hint of flavor. Keep in mind that this will change the wet-to-dry ratio slightly, so adjust accordingly.
-
Flavor Extravaganza: Add a dash of peppermint extract to your batter for a festive twist that brings the holiday cheer alive.
-
Nutty Surprise: Fold in some finely chopped hazelnuts or walnuts into the batter for an extra crunch and flavor boost.
-
Frosting Alternatives: Try a velvety cream cheese frosting using dairy-free cream cheese for an indulgent alternative that compliments the chocolate beautifully.
-
Decadent Delights: For a more chocolatey experience, mix in some chocolate chips before baking—your taste buds will thank you for it!
-
Fiery Kick: Sprinkle in a pinch of cayenne pepper or chili powder for a surprisingly delightful heat that pairs beautifully with chocolate.
-
Seasonal Touch: Swap in pumpkin puree for half of the dairy-free milk to embrace those cozy fall flavors, reminiscent of a classic pumpkin pie.
If you’re looking for more fun ideas, check out my Chewy Pumpkin Chocolate Chip Cookies for another warm treat or try these delicious Sausage Rolls with Hot Honey and Thyme that might surprise your guests at your holiday gathering!
Expert Tips for Gluten-Free Hot Chocolate Cupcakes
-
Room Temperature Ingredients: Ensure all ingredients are at room temperature for optimal mixing and a smooth batter. This greatly improves the texture of your gluten-free hot chocolate cupcakes.
-
Avoid Overbaking: Keep a close eye on your cupcakes, particularly around the 18-minute mark. Overbaking can lead to dryness, which is a common mistake with gluten-free treats.
-
Check Doneness Wisely: Use the toothpick test and remove cupcakes from the oven when a toothpick comes out with a few moist crumbs. This helps retain their soft and moist texture.
-
Absolute Cool Before Frosting: Allow the cupcakes to cool completely before frosting with dairy-free buttercream. Frosting on warm cupcakes can melt and create a mess.
-
Experiment with Toppings: Feel free to get creative with toppings! Different toppings can enhance the festive appeal and make your gluten-free hot chocolate cupcakes even more special.
Make Ahead Options
These Gluten-Free Hot Chocolate Cupcakes are perfect for making ahead of time, saving you precious moments in the kitchen during busy holiday gatherings! You can prepare the cupcake batter and store it in the fridge for up to 24 hours to keep it fresh and ready for baking. Just be sure to keep it airtight to prevent any drying out. Additionally, you can bake and cool the cupcakes completely, then store them unfrosted in an airtight container at room temperature for up to 3 days. When it’s time to serve, simply whip up the frosting, fill the cupcakes with chocolate spread, frost them, and add mini marshmallows for that delightful touch. You’ll have a crowd-pleasing dessert that’s just as delicious as if made fresh!
Gluten-Free Hot Chocolate Cupcakes Recipe FAQs
How do I choose ripe ingredients for my cupcakes?
Absolutely! For the best results, select fresh eggs that are at room temperature, ensuring they mix well into your batter. Use high-quality cocoa powder that is unsweetened and keeps in a cool, dry place. The dairy-free milk should be fresh, and I recommend checking for its smell and consistency to avoid any off flavors.
What is the best way to store gluten-free hot chocolate cupcakes?
Keep your cupcakes in an airtight container at room temperature for up to 3 days to maintain their moistness. If you want them to last longer, transferring them to the fridge is a good option—just remember to cover them well. This way, they can stay fresh for up to 5 days!
Can I freeze these cupcakes?
Of course! Freezing is a great way to keep your gluten-free hot chocolate cupcakes fresh for later enjoyment. To do this, allow the cupcakes to cool completely, then wrap each unfrosted cupcake tightly in plastic wrap. Next, place them in a freezer-safe bag. They can be stored for up to 3 months. When you’re ready to serve, thaw them at room temperature, then frost and enjoy!
What should I do if my cupcakes come out dry?
Very! If you find your cupcake is dry, this can often happen with gluten-free baking. Be sure to check your baking time next time—you may need to reduce it slightly. Additionally, ensure that your ingredients are measured correctly, as gluten-free flours can vary widely. Finally, include a moistening agent, like applesauce or an additional splash of dairy-free milk, in your batter to improve overall moistness.
Are these cupcakes safe for those with allergies?
Definitely! These gluten-free hot chocolate cupcakes are dairy-free and can be adapted for various dietary needs. For egg allergies, substituting with flax eggs (1 tablespoon ground flax mixed with 3 tablespoons water for each egg) works wonderfully. Always double-check ingredients for potential allergens, especially if you plan to serve them at gatherings where guests may have restrictions.
What toppings can I use to enhance my cupcakes?
The more the merrier! While I recommend mini marshmallows for that classic hot chocolate touch, feel free to get creative. You could use crushed peppermint candies for a festive twist or sprinkle some toasted coconut for added texture. Drizzling with dairy-free chocolate ganache or caramel could turn your cupcakes into a dessert sensation that will delight your guests!

Irresistibly Moist Gluten-Free Hot Chocolate Cupcakes
Ingredients
Equipment
Method
- Preheat your oven to 180°C (350°F) and line your muffin tin with cupcake liners.
- In a bowl, whisk together the granulated sugar, gluten-free flour blend, baking powder, cocoa powder, and xanthan gum.
- In another bowl, whisk the dairy-free milk, eggs, vanilla extract, and melted butter until combined.
- Fold the wet ingredients into the dry mixture, then stir in the hot coffee.
- Divide the batter among the liners, filling each about three-quarters full.
- Bake in the oven for 20 minutes until they spring back when touched.
- Let the cupcakes cool in the tin for 10 minutes, then on a wire rack until completely cool.
- Beat the diary-free butter until fluffy, then add icing sugar and milk for frosting.
- Cut a well into each cooled cupcake, fill with chocolate spread, and frost with buttercream.
- Garnish with mini marshmallows and cocoa powder.
Leave a Reply