
There’s something magical about a well-crafted sandwich that transforms a simple meal into an extraordinary experience. My Crispy Chicken Caesar Sandwich embodies that enchantment with its tantalizing layers of golden-fried chicken, crunchy parmesan crust, and fresh romaine lettuce, all enveloped in a creamy homemade Caesar dressing. This handheld meal is not only a quick lunch option but also a satisfying way to elevate your midday break from the usual fast food grind. Perfectly crispy and immensely satisfying, it’s like savoring a gourmet Caesar salad in sandwich form! Ready to dive into this deliciousness? Let’s uncover the secrets behind crafting this crowd-pleaser that promises to keep you coming back for more!

Why will you love this Crispy Chicken Sandwich?
Irresistible Crunch: Each bite of the sandwich showcases crispy, golden fried chicken coated in a savory parmesan crust that’s hard to resist.
Creamy Delight: The homemade Caesar dressing adds a luscious creaminess that perfectly complements the crunchy ingredients, transporting your taste buds to culinary heaven!
Quick to Make: Perfect for busy weekdays, this sandwich can be prepared swiftly, making it an ideal choice for a satisfying lunch without the fast food guilt.
Versatile Options: With simple swaps like chicken tenders or even tofu, you can easily customize this recipe to fit your dietary needs or preferences.
Crowd-Pleaser: Whether you’re serving family or hosting a weekend get-together, this sandwich is sure to impress, making it a go-to meal for gatherings!
Elevate your sandwich game today and complement your Crispy Chicken Caesar Sandwich with a side of classic French fries or enjoy it alongside a refreshing drink for the ultimate meal experience.
Crispy Chicken Caesar Sandwich Ingredients
• For the Dressing
- Full-Fat Mayonnaise – Adds richness and creaminess; substitute with Greek yogurt for a healthier alternative.
- Greek Yogurt – Lightens up the dressing and adds tang; can replace with sour cream.
- Dijon Mustard – Contributes tanginess; substitute with yellow mustard for a milder flavor.
- Worcestershire Sauce – Provides umami depth; no known substitutes, but can omit for a simpler dressing.
- Lemon Juice – Brightens the dressing and balances flavors; fresh juice is preferred but bottled juice works too.
- Parmesan Cheese – Adds a nutty, salty flavor to the dressing; Grana Padano can be used for a milder taste.
- Garlic Cloves – Offer a strong aromatic flavor; minced shallots make a suitable substitute if garlic is too strong.
- Black Pepper and Sea Salt – Essential seasoning agents to enhance flavor.
• For the Chicken
- Chicken Cutlets – The main protein providing a satisfying crunch; substitute with chicken thighs for more flavor.
- All-Purpose Flour – Used for breading; creates a base layer that can be replaced with gluten-free flour.
- Smoked Paprika – Adds depth and a hint of smokiness; regular paprika is a good substitute.
- Eggs – Binds ingredients for breading; no substitutes; flaxseed meal can be used for vegan alternatives.
- Panko Crumbs – Adds superior crunchiness to the breading; regular breadcrumbs can replace for less crunch.
- Dried Herbs (Parsley, Oregano) – Enhance flavor profile; fresh herbs can be substituted for more aroma.
• For the Sandwich
- Romaine Hearts – Provides crispness and freshness; iceberg lettuce is a viable alternative.
- French Baguettes – Opt for crusty bread to support the filling without becoming soggy; ciabatta or sourdough are great substitutes.
Now, gather these ingredients and prepare for a deliciously crunchy Crispy Chicken Caesar Sandwich that’s sure to elevate your lunch game!
Step‑by‑Step Instructions for Crispy Chicken Caesar Sandwich
Step 1: Prepare the Dressing
In a medium bowl, combine full-fat mayonnaise, Greek yogurt, Dijon mustard, Worcestershire sauce, lemon juice, grated Parmesan cheese, minced garlic, black pepper, and sea salt. Whisk everything together until you achieve a smooth, creamy texture. Reserve a small amount of dressing for assembling the sandwiches later. This homemade Caesar dressing adds an irresistible richness to your Crispy Chicken Caesar Sandwich.
Step 2: Prep Chicken
Take your chicken cutlets and place them between two sheets of plastic wrap. Use a meat mallet to pound the cutlets to an even thickness of about ½ inch. This ensures that the chicken cooks evenly. Season both sides generously with salt and pepper, enhancing the flavor of your crispy chicken that will be the star of the sandwich.
Step 3: Set Up the Breading Station
Prepare a three-bowl breading station. In the first bowl, combine all-purpose flour with smoked paprika for added flavor. In the second bowl, whisk together the eggs until frothy. Lastly, in a third bowl, mix panko crumbs with dried herbs for extra texture. This setup will help you achieve that delightful crunch in your Crispy Chicken Caesar Sandwich.
Step 4: Bread the Chicken
Begin breading the chicken cutlets by dredging each piece in the flour mixture, ensuring even coverage. Next, dip the floured cutlet into the whisked eggs, allowing any excess to drip off. Finally, coat the chicken thoroughly in the panko mixture, pressing gently to adhere. Lay the breaded cutlets on a plate while you prepare to fry.
Step 5: Fry the Chicken
Heat about 1 inch of vegetable oil in a large skillet over medium heat, aiming for a temperature of around 175-180°C (350-360°F). Once the oil is hot, carefully add the breaded cutlets to the pan without crowding them. Fry for about 4-5 minutes on each side until golden brown and crispy. Using a slotted spoon, transfer the cooked chicken to a wire rack to drain excess oil.
Step 6: Assemble the Sandwich
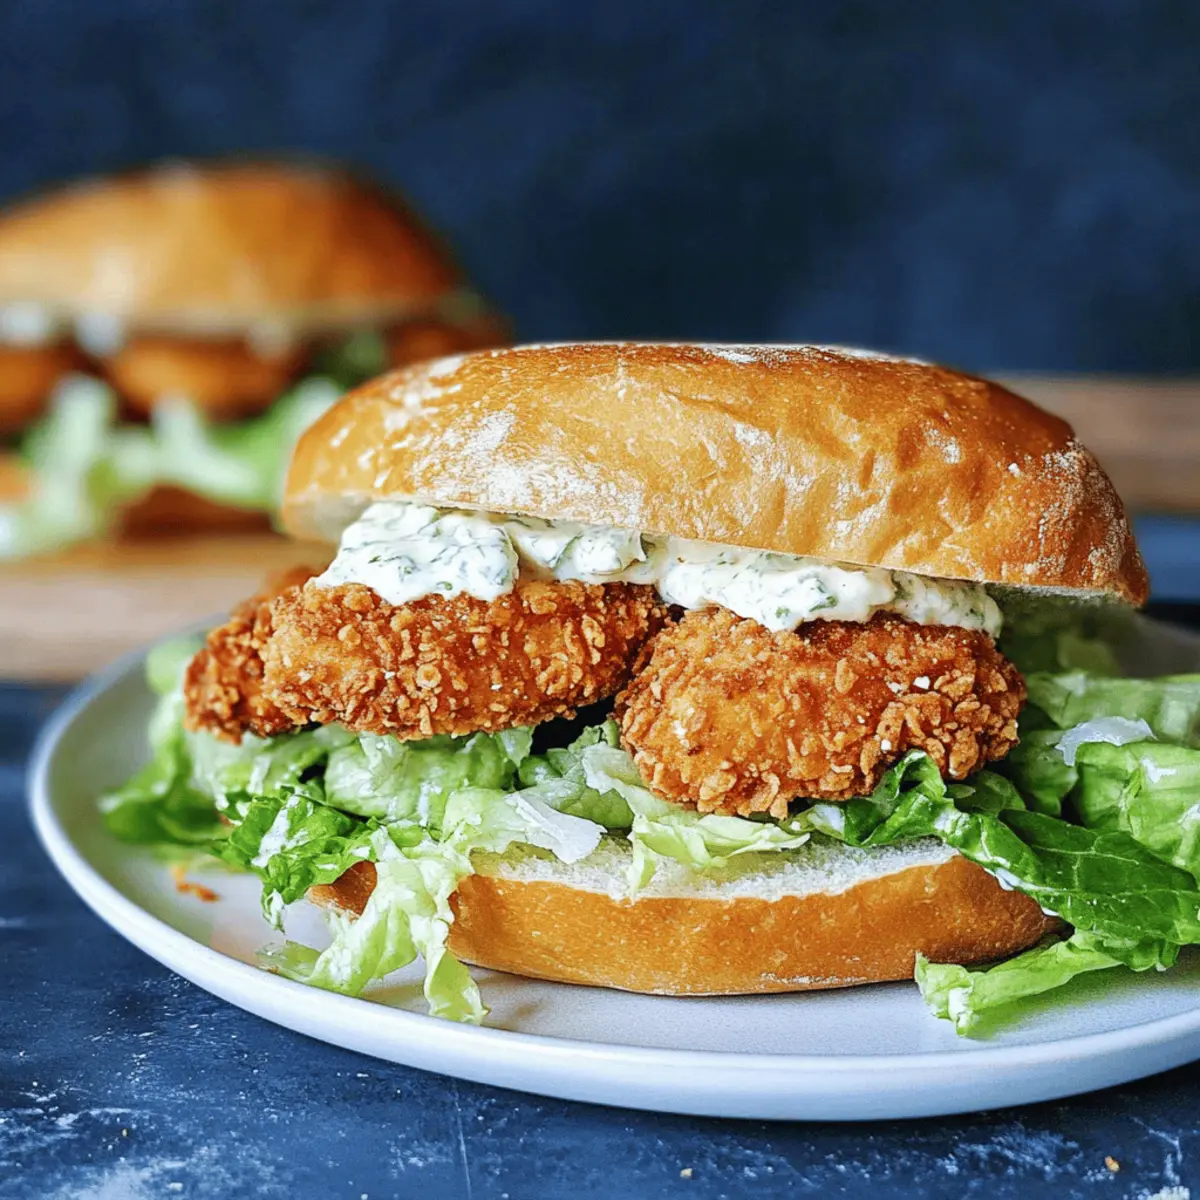
Slice your crusty French baguettes in half lengthwise. Begin by spreading a generous layer of your creamy Caesar dressing on each side of the bread. Place a crispy chicken cutlet on the bottom half, then add a handful of freshly dressed romaine hearts for crunch. Sprinkle with extra Parmesan cheese before topping with the other half of the baguette, creating a delicious Crispy Chicken Caesar Sandwich.
Step 7: Serve Immediately
For the best experience, serve your Crispy Chicken Caesar Sandwich immediately while the chicken is still hot and crispy. Pair it with classic sides like French fries or a refreshing salad to complement this hearty handheld meal. Enjoy the delightful combination of textures and flavors that will make this a new favorite!
Storage Tips for Crispy Chicken Caesar Sandwich
Fridge: Store any leftover components, such as fried chicken and Caesar dressing, in airtight containers for up to 3 days to maintain freshness and flavor.
Separate Storage: Keep the sandwich assembled just before eating to avoid sogginess. If prepared in advance, store the crispy chicken and dressing separately.
Freezer: You can freeze the breaded and fried chicken cutlets for up to 2 months. Allow thawing in the fridge overnight before reheating for the best texture in your Crispy Chicken Caesar Sandwich.
Reheating: To reheat unfrozen crispy chicken, place it in a preheated oven at 180°C (350°F) for about 10-15 minutes to restore its crunchiness.
What to Serve with Crispy Chicken Caesar Sandwich
Elevate your dining experience with delightful accompaniments that perfectly complement the crunchy textures and creamy flavors of your sandwich.
-
Crispy French Fries: The golden crunch of fries provides a satisfying contrast, making them a quintessential sidekick to any sandwich.
-
Jalapeño Cucumber Salad: This refreshing salad offers a cool, zesty tang that balances the rich flavors of the sandwich, keeping your palate excited.
-
Garlic Bread Sticks: Soft bread infused with garlic and parsley adds a delightful aroma, serving as a hearty companion to the crispy chicken delight.
-
Classic Caesar Salad: Keep the Caesar theme going! A light Caesar salad offers a crispy counterpart and continues the wonderful flavor journey seamlessly.
-
Sweet Potato Wedges: A subtly sweet and slightly smoky twist that adds a delicious warmth and contrast to the savory aspects of your meal.
-
Iced Tea or Lemonade: Cold beverages like lemonade or iced tea bring a refreshing zest, perfect for washing down the sandwich goodness while keeping it light.
Pair one or more of these options with your Crispy Chicken Caesar Sandwich for a satisfying meal that feels both complete and indulgent!
Make Ahead Options
These Crispy Chicken Caesar Sandwiches are perfect for meal prep enthusiasts! You can prepare the homemade Caesar dressing and refrigerate it for up to 3 days in advance, keeping it fresh and flavorful. Additionally, bread and fry the chicken cutlets a day ahead; just store them in an airtight container to maintain their crispy texture. When you’re ready to enjoy your sandwiches, simply assemble the ingredients by slicing the baguettes, spreading the reserved dressing, and adding the cutlets and dressed romaine. This strategy not only saves you valuable time during busy weeknights but also ensures you’ll have a delicious, quick meal that tastes just as delightful as when made fresh!
Expert Tips for Crispy Chicken Caesar Sandwich
• Temperature Control: Keep oil temperature between 175-180°C (350-360°F) to ensure the chicken gets crispy rather than soggy.
• Breading Technique: Make sure to coat the chicken thoroughly in flour, egg, and panko to create a perfect crispy texture for the Crispy Chicken Caesar Sandwich.
• Fresh Assembly: To prevent sogginess, assemble the sandwich just before serving. Toasting the bread can also help create a moisture barrier.
• Chicken Thickness: Pound chicken cutlets to an even ½ inch thickness for consistent cooking, ensuring each bite is crunchy and delicious.
• Resting Time: Let the fried chicken rest on a wire rack instead of a plate, allowing excess oil to drain for optimal crispiness.
Crispy Chicken Caesar Sandwich Variations
Feel free to explore creativity with this tasty sandwich and make it your own!
-
Vegetarian Option: Swap chicken cutlets for crispy tofu slices, giving a delightful crunch and plant-based goodness.
-
Whole Wheat: Use a whole wheat baguette for added nutrients while keeping it soft and delicious. This small twist can bring a wholesome touch to the meal.
-
Extra Veggies: Add sliced tomatoes or creamy avocado to the sandwich for a burst of freshness and flavor. Your taste buds will thank you for this colorful enhancement!
-
Spicy Kick: Incorporate sliced jalapeños or a dash of hot sauce into the dressing for a spicy version that brings the heat.
-
Herbaceous Twist: Mix in fresh basil or cilantro into the Caesar dressing for an aromatic blend with a hint of brightness.
-
Cheesy Delight: Top off your sandwich with a sprinkle of mozzarella or provolone for a melty, cheesy compliment that melts in your mouth.
-
Nuts for Crunch: Add crushed toasted almonds or walnuts inside for a surprising crunch that also elevates nutrition and flavor.
Pair these ideas with a side of crispy French fries or a refreshing jalapeño cucumber salad, and you’re on your way to a perfect meal!

Crispy Chicken Caesar Sandwich Recipe FAQs
How do I select the best chicken for my sandwich?
When choosing chicken for your Crispy Chicken Caesar Sandwich, opt for boneless, skinless chicken cutlets for even cooking and the perfect crunch. Look for fresh cuts without dark spots or unpleasant odors. If you prefer more flavor, chicken thighs are an excellent alternative!
How should I store leftovers from the Crispy Chicken Caesar Sandwich?
Store any leftover components in airtight containers for up to 3 days. Keep the fried chicken and Caesar dressing separate to maintain their textures. The sandwich itself should be assembled just before eating to prevent sogginess – trust me, it’s worth the wait!
Can I freeze the components of the sandwich?
Absolutely! You can freeze the breaded and fried chicken cutlets for up to 2 months. To do this, allow the cutlets to cool completely, then wrap them tightly in plastic wrap and place them in a freezer-safe bag. When you’re ready to enjoy, thaw them overnight in the fridge and reheat in a preheated oven at 180°C (350°F) for about 10-15 minutes to get that crunch back!
What if my breading doesn’t turn out crispy?
If your breading isn’t crispy, ensure you’re maintaining the right oil temperature (175-180°C / 350-360°F) when frying. Also, make sure you thoroughly coat the chicken in flour, egg, and panko crumbs. If necessary, let the fried chicken rest on a wire rack to drain excess oil, promoting that perfect crispy texture.
Is this recipe suitable for those with dietary restrictions?
Great question! The Crispy Chicken Caesar Sandwich can accommodate various dietary needs. For a gluten-free version, you can substitute all-purpose flour with gluten-free flour and use gluten-free breadcrumbs. Those following a vegetarian diet can swap out chicken for tofu or veggie cutlets. And if you’re not a fan of mayonnaise, try substituting it with Greek yogurt for a lighter dressing!
Can cats or dogs enjoy the leftovers?
While the components like plain chicken (without breading and spices) can occasionally be shared with your furry friends, be cautious with the Caesar dressing. The sauce contains ingredients like garlic and salt that could be harmful to pets. It’s best to keep them away from the dressing and serve them plain, cooked chicken instead.

Crispy Chicken Caesar Sandwich: A Crunchy Flavor Explosion
Ingredients
Equipment
Method
- In a medium bowl, combine full-fat mayonnaise, Greek yogurt, Dijon mustard, Worcestershire sauce, lemon juice, grated Parmesan cheese, minced garlic, black pepper, and sea salt. Whisk until smooth.
- Pound the chicken cutlets to ½ inch thickness and season with salt and pepper.
- Prepare a three-bowl breading station: one for flour and paprika, one for beaten eggs, and one for panko crumbs and herbs.
- Dredge chicken in the flour mixture, dip in eggs, then coat with panko crumbs.
- Heat vegetable oil in a skillet over medium heat. Fry the breaded chicken cutlets for 4-5 minutes on each side until golden brown.
- Slice the baguettes in half and spread Caesar dressing on each half. Add the chicken cutlet and romaine before topping with the other half.
- Serve the sandwiches immediately for the best taste and texture.
Leave a Reply