
As I sifted through the remnants of a vibrant spring afternoon, a delightful notion took shape in my mind: a Chocolate Easter Egg Nest Cake. This playful dessert not only embraces the rich, velvety essence of chocolate but also invites a burst of color with its whimsical nest and festive mini eggs. It’s an enchanting way to celebrate the season, making it a must-try for gatherings with family and friends. With its gluten-free, vegan, and keto adaptations, this cake is a true crowd-pleaser that checks all the boxes, whether you’re looking for indulgence or dietary flexibility. So, are you ready to make this delightful cake the centerpiece of your next celebration? Let’s dive into the delicious details!
Why choose this Easter cake recipe?
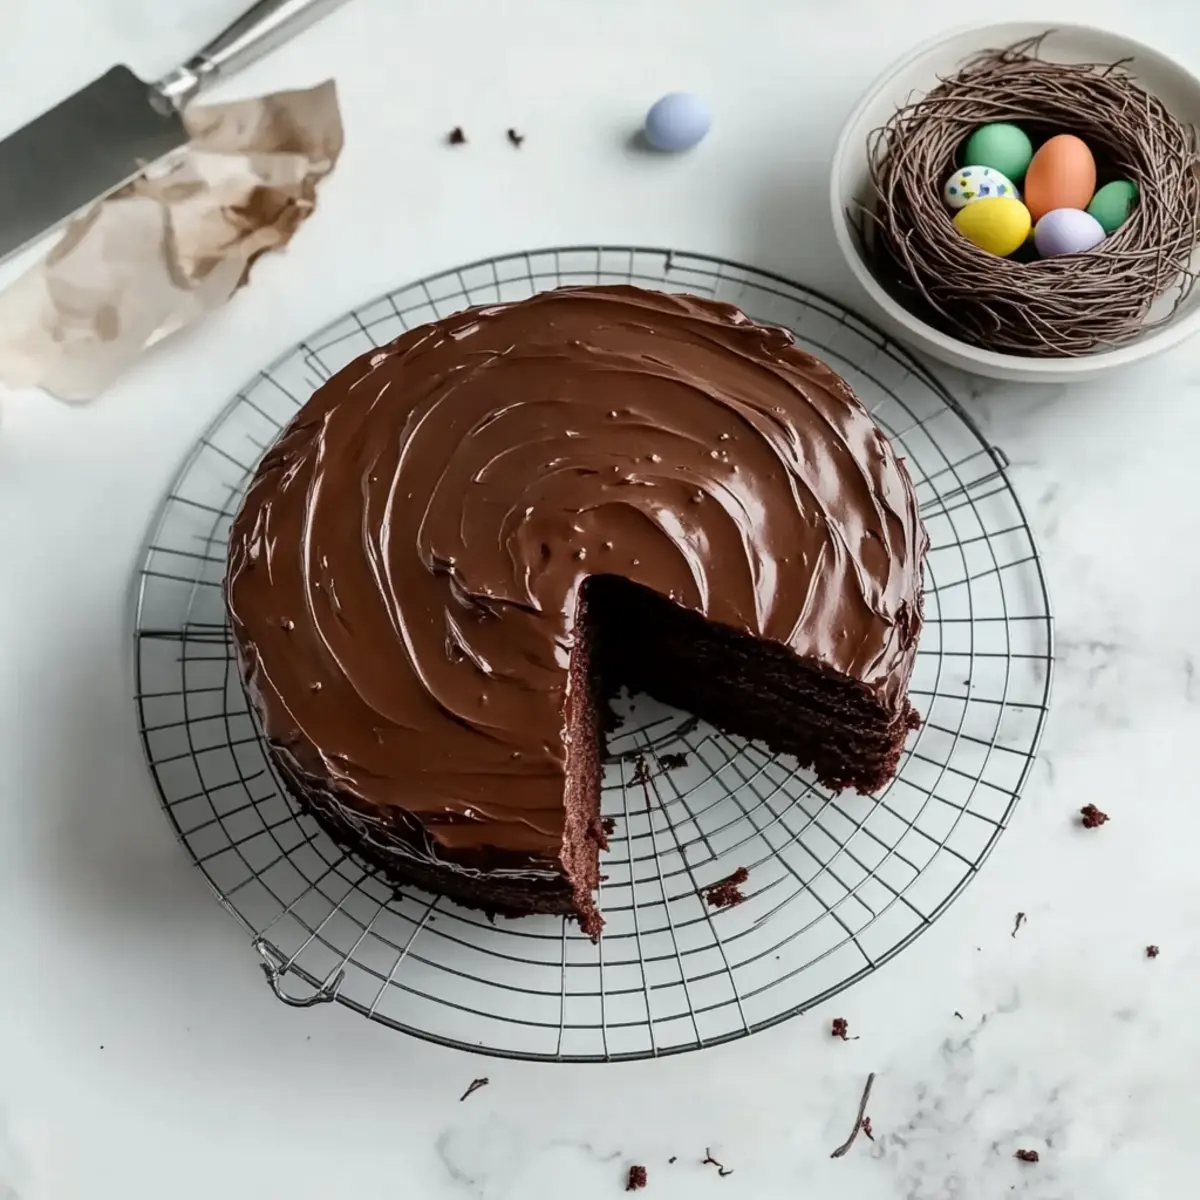
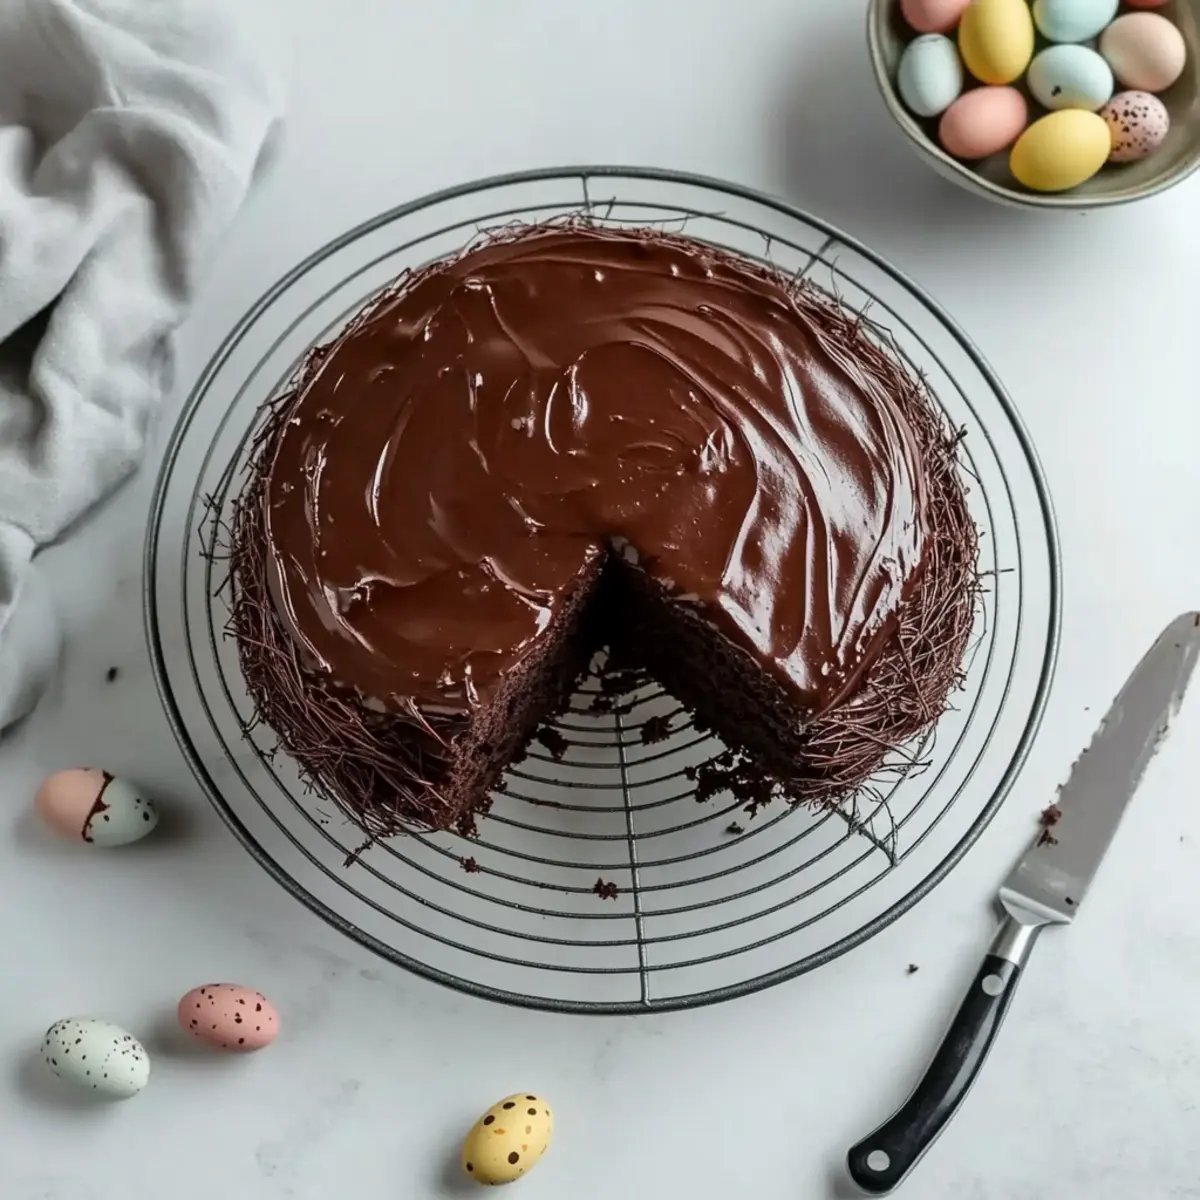
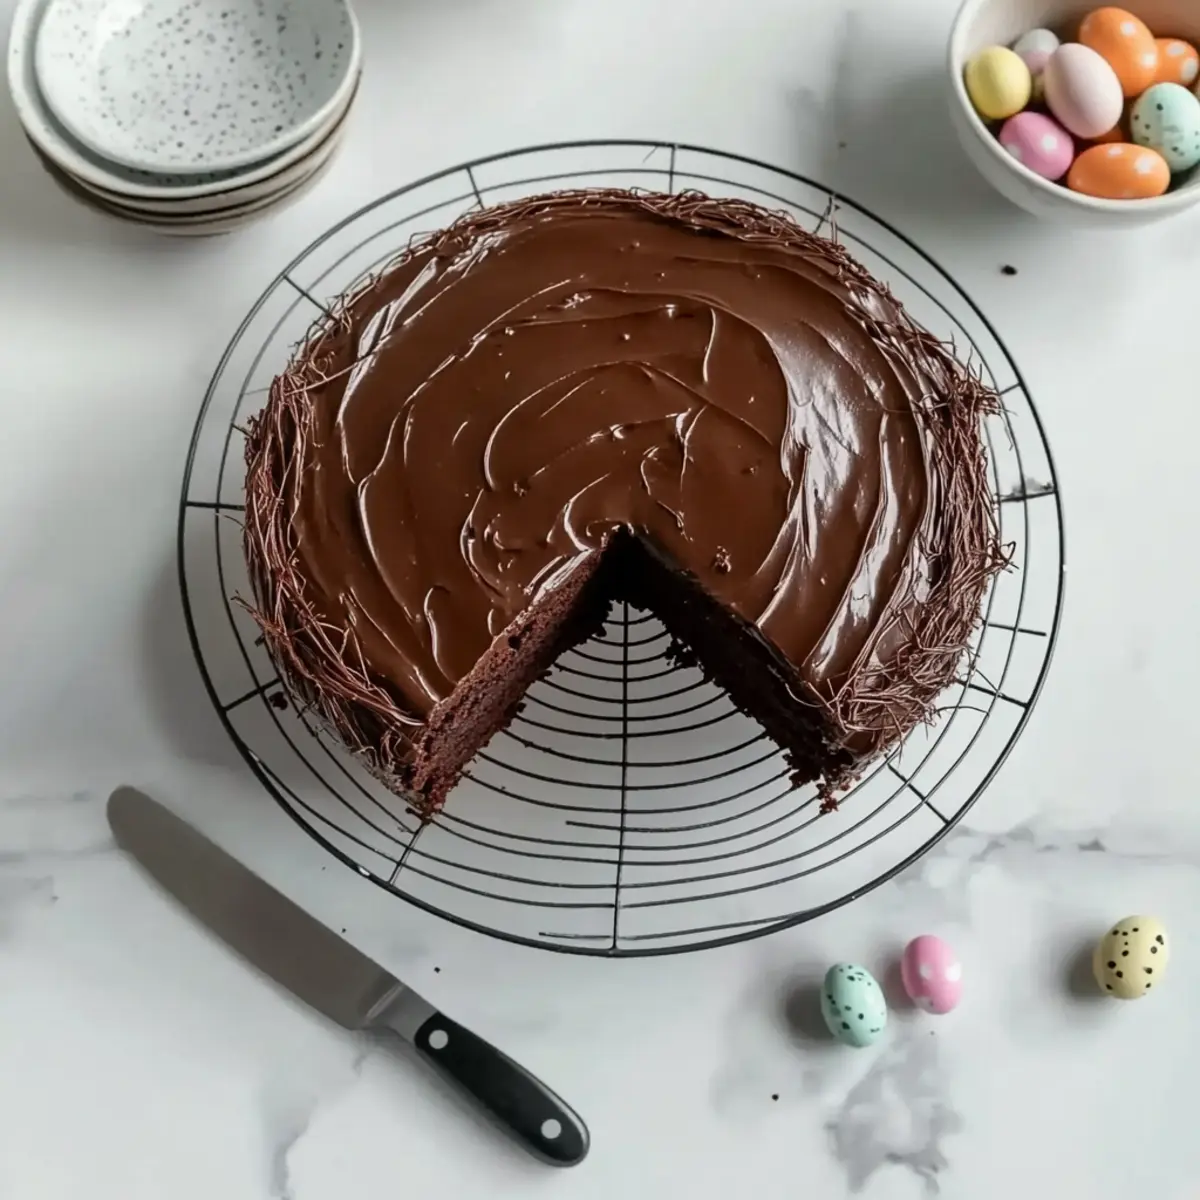
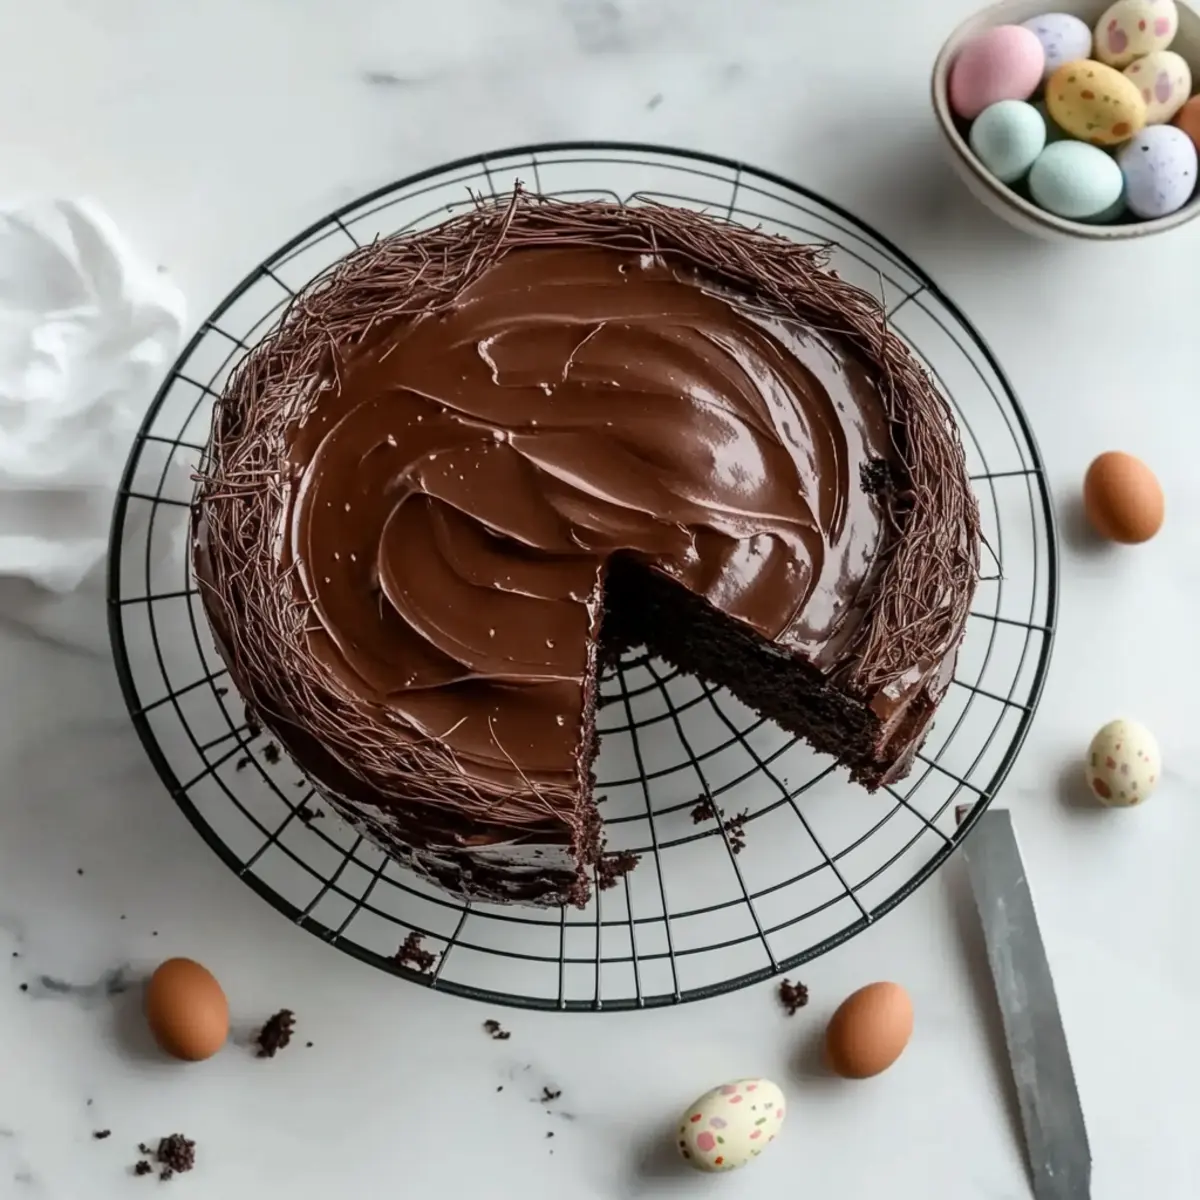
Delightful Presentation: The charming chocolate nest atop this cake not only adds flair but also a playful element to your dessert table.
Versatile Options: Whether you need a gluten-free treat or a vegan version, this Chocolate Easter Egg Nest Cake adapts beautifully to various dietary needs.
Rich Flavor: The deep cocoa and smooth ganache create a luxurious experience that chocolate lovers will adore.
Crowd-Pleasing Appeal: Perfect for Easter gatherings, this cake offers something for everyone and is sure to impress your guests.
Quick & Easy: With straightforward steps, you can make this unforgettable dessert in no time. For a simple yet indulgent treat, consider pairing it with a scoop of ice cream or fresh berries.
Beautiful Variations: Experiment with different chocolate or decorative options, like a chewy pumpkin chocolate twist, to make it your own!
Chocolate Easter Egg Nest Cake Ingredients
• Discover the delightful components of this charming dessert!
For the Cake
- Flour – Provides structure; feel free to substitute with gluten-free flour for a gluten-free option.
- Cocoa Powder – Delivers a rich chocolate flavor; be sure to choose unsweetened cocoa for the best results.
- Sugar – Adds sweetness and moisture; try coconut sugar for a lower glycemic alternative.
- Buttermilk – Contributes to moisture and a slight tang; use dairy-free milk with a splash of vinegar as a substitute.
- Oil – Ensures moisture; coconut oil can impart a lovely, unique flavor.
- Eggs – Binds the ingredients and provides structure; for a vegan cake, replace with flax eggs.
- Vanilla Extract – Enhances flavor; stick with pure extract for maximum taste.
- Hot Coffee – Intensifies the cocoa flavor; if unavailable, plain hot water works just fine.
For the Ganache
- Dark Chocolate – Creates a creamy, rich topping; you can swap with white chocolate for a different look.
- Butter – Adds creaminess and shine; dairy-free margarine works wonderfully for a vegan option.
For the Nest
- Chocolate – The main ingredient for creating the decorative nest; opt for high-quality chocolate for the best texture.
Step‑by‑Step Instructions for Chocolate Easter Egg Nest Cake
Step 1: Preheat the Oven
Begin by preheating your oven to 350°F (175°C). Grease a 9-inch round cake pan with butter or non-stick spray to ensure your Chocolate Easter Egg Nest Cake releases easily after baking. Set the pan aside while you gather and prepare the dry ingredients.
Step 2: Mix the Dry Ingredients
In a large mixing bowl, combine 1.5 cups of all-purpose flour, 1 cup of unsweetened cocoa powder, and 1.5 cups of sugar. Whisk the ingredients together thoroughly until fully blended and there are no lumps. This will give your cake a rich chocolate flavor and ensure a uniform texture throughout.
Step 3: Combine the Wet Ingredients
In a separate bowl, whisk together 1 cup of buttermilk, 1/2 cup of oil, 3 large eggs, and 2 teaspoons of vanilla extract. Mix until the mixture is smooth and slightly frothy. This moist combination is crucial for your Chocolate Easter Egg Nest Cake to be tender and delicious.
Step 4: Incorporate the Hot Coffee
Gradually add 1 cup of hot coffee to the wet mixture, stirring continuously until well combined. The heat from the coffee will enhance the cocoa flavor without making the mixture too thick. Ensure it’s mixed evenly so your cake can rise beautifully as it bakes.
Step 5: Combine the Mixtures
Slowly pour the wet ingredients into the bowl containing the dry ingredients. Using a spatula or wooden spoon, gently fold the mixtures together until no dry flour is visible. Be careful not to overmix, as this can lead to a denser cake.
Step 6: Pour into Prepared Pan
Pour the chocolate batter into the greased 9-inch round pan, ensuring it’s evenly distributed. Smooth the top with a spatula for a nice finish. This will help your Chocolate Easter Egg Nest Cake rise evenly in the oven.
Step 7: Bake the Cake
Place the pan in the preheated oven and bake for 30-35 minutes. To check for doneness, insert a toothpick in the center; it should come out clean or with a few moist crumbs. This step ensures your cake is baked to perfection, retaining its moisture.
Step 8: Cool the Cake
Once baked, remove the cake from the oven and let it cool in the pan for about 10 minutes. Then, transfer it onto a wire rack to cool completely. This cooling period is crucial before you add the glossy ganache topping.
Step 9: Make the Ganache
For the ganache, heat 1 cup of dark chocolate and 1/2 cup of butter in a microwave-safe bowl for about 30-60 seconds until melted. Stir until smooth and allow it to cool slightly until it reaches a pourable consistency. This luxurious ganache will adorn your cake beautifully.
Step 10: Prepare the Chocolate Nest
Melt additional chocolate for the decorative nests. Pipe the melted chocolate into nest shapes on a parchment-lined baking sheet. Make sure to work quickly before the chocolate sets, then refrigerate the nests until firm, around 15-20 minutes.
Step 11: Assemble the Cake
Once the cake has cooled completely, pour the ganache over the top, allowing it to drip down the sides for an enticing look. Gently place the chocolate nests filled with mini eggs atop the cake. This final touch will make your Chocolate Easter Egg Nest Cake a showstopper at any spring celebration.
Expert Tips for the Chocolate Easter Egg Nest Cake
Choose Quality Ingredients: Use high-quality cocoa powder and chocolate to ensure a deep chocolate flavor in your cake.
Cool Before Ganache: Allow your cake to cool completely before applying ganache; this prevents the ganache from sliding off or melting too much into the cake.
Avoid Overmixing: When combining wet and dry ingredients, mix just until combined; overmixing can lead to a dense cake rather than the light texture desired in this Chocolate Easter Egg Nest Cake.
Create Sturdy Nests: When shaping the chocolate nests, make sure the chocolate is melted but not too hot, allowing for better form. Use a piping bag for precise shapes.
Store Properly: Keeping the cake in an airtight container limits moisture loss; it can be held at room temperature for two days or refrigerated for a week, enhancing its flavors.
How to Store and Freeze Chocolate Easter Egg Nest Cake
Room Temperature: Keep the cake in an airtight container for up to 2 days at room temperature to maintain its moisture and flavor.
Fridge: If you want to enjoy it longer, refrigerate the cake for up to a week in an airtight container. The cool temperature may enhance the chocolate flavors.
Freezer: For longer storage, wrap individual slices or entire layers without ganache tightly in plastic wrap and foil; freeze for up to 3 months while retaining the delightful taste of the Chocolate Easter Egg Nest Cake.
Reheating: When ready to enjoy, let the cake thaw in the fridge overnight. For a warm treat, gently microwave slices for 10-15 seconds, ensuring not to overheat.
Make Ahead Options
These Chocolate Easter Egg Nest Cakes are perfect for busy home cooks looking to save time! You can prepare the cake layers up to 24 hours in advance; simply allow them to cool completely before wrapping tightly in plastic wrap and storing them at room temperature. The ganache can also be made ahead and refrigerated for up to 3 days—just gently reheat it to a pourable consistency before using. Additionally, you can create the chocolate nests and refrigerate them overnight to maintain their shape and crispness. When you’re ready to serve, simply frost the cake with the ganache and adorn it with the chocolate nests for a stunning and delectable dessert that minimizes your last-minute efforts!
What to Serve with Chocolate Easter Egg Nest Cake
Imagine the delightful spread of flavors and textures that can accompany this rich chocolate cake, creating a truly memorable meal.
- Fresh Berries: The natural tartness of strawberries, raspberries, or blueberries balances the sweetness of the cake beautifully, enhancing your dessert experience.
- Vanilla Ice Cream: A scoop of creamy vanilla ice cream brings a luscious contrast to the cake’s rich chocolate, providing a classic pairing that never disappoints.
- Whipped Cream: Light and airy, whipped cream adds a silky topping that complements the dense cake, inviting indulgent spoonfuls.
- Chocolate Sauce: Drizzling extra chocolate sauce over the cake can intensify the flavor for true chocolate lovers, making every bite a decadent delight!
For a drink option, consider serving with a Rich Coffee: Pairing this cake with a rich cup of coffee enhances the chocolate notes, creating a warm and inviting experience for your guests.
Lastly, Fruity Sangria can be a refreshing beverage option. The fruity flavors contrast with the cake, providing a fun twist to your celebration.
Chocolate Easter Egg Nest Cake Variations
Feel free to let your creativity run wild, as this delightful cake can be tailored to fit everyone’s taste!
-
Gluten-Free: Substitute all-purpose flour with a gluten-free blend to ensure everyone can enjoy this cake without worry.
-
Vegan: Use flax eggs instead of traditional eggs and opt for dairy-free milk and margarine to keep it plant-based. It’s just as indulgent!
-
Keto-Friendly: Swap sugar for a keto-friendly sweetener like erythritol. The results are a dessert that satisfies without the carbs.
-
Nut-Free: Choose nut-free dairy alternatives and ensure your chocolate is also nut-free to keep this Easter treat safe for all guests.
-
Flavor Boost: Enhance the cake with a splash of almond or orange extract to add a surprising twist to the traditional chocolate flavor.
-
Fruity Layers: Add layers of fresh fruit, like strawberries or raspberries, under the ganache for a burst of flavor and a refreshing contrast.
-
Texture Twist: Crushed cookies or edible glitter can be sprinkled around the nests for added texture and visual appeal.
-
Spicy Kick: For a surprise heat, sprinkle a pinch of cayenne pepper into the chocolate batter for an unexpected chocolate-chili combo.
These variations not only cater to different dietary needs but also invite you to experiment. For another festive treat, check out this delightful Mocha Cake Fudge, or if you’re in the mood for something lighter, a slice of Pumpkin Chocolate Chip cake might just hit the spot!
Chocolate Easter Egg Nest Cake Recipe FAQs
What type of flour should I use for the cake?
All-purpose flour works wonderfully for this recipe, but if you’re looking for a gluten-free option, simply swap it out for a gluten-free flour blend. Many of my friends have found excellent results with almond or coconut flour! Just remember that different flours may alter the texture slightly, so choose what suits your needs.
How should I store any leftovers?
To keep your Chocolate Easter Egg Nest Cake fresh, place it in an airtight container. At room temperature, it will stay moist for up to 2 days. Alternatively, you can refrigerate it, and it will last about a week. Just be sure to let it sit at room temperature for a few minutes before serving for the best texture!
Can I freeze the cake?
Absolutely! If you want to freeze it, wrap individual slices or the whole cake (without ganache) tightly in plastic wrap and then foil to protect it from freezer burn. It can last up to 3 months. When you’re ready to enjoy, simply thaw it in the refrigerator overnight – or pop it in the microwave for about 10-15 seconds for a warm treat.
What if my ganache is too thick?
If your ganache has thickened more than you’d like, don’t worry! Gently reheat it in the microwave in 10-second intervals, stirring in between until it reaches a smooth, pourable consistency. This step is vital to ensure you get that glossy finish on your cake!
Is this cake suitable for people with allergies?
The Chocolate Easter Egg Nest Cake can easily be adapted for various dietary needs. For a vegan version, substitute the eggs with flax eggs and use dairy-free margarine for the ganache. If someone is allergic to nuts, select nut-free milk alternatives. Just be sure to check all ingredient labels to ensure they meet dietary restrictions.
How can I enhance the flavor of the cake?
For a richer flavor, consider using high-quality cocoa powder and dark chocolate in your ganache. Additionally, adding a teaspoon of espresso powder to the dry ingredients can intensify the chocolate flavor without tasting like coffee. So, if you’re a chocolate lover, this little tip will take your cake to the next level!
Decadent Chocolate Easter Egg Nest Cake to Wow Your Guests
Ingredients
Equipment
Method
- Preheat your oven to 350°F (175°C). Grease a 9-inch round cake pan with butter or non-stick spray.
- In a large mixing bowl, combine 1.5 cups of all-purpose flour, 1 cup of unsweetened cocoa powder, and 1.5 cups of sugar. Whisk together until blended.
- In a separate bowl, whisk together 1 cup of buttermilk, 0.5 cups of oil, 3 large eggs, and 2 teaspoons of vanilla extract until smooth.
- Gradually add 1 cup of hot coffee to the wet mixture, stirring continuously until well combined.
- Pour the wet ingredients into the dry ingredients. Fold together until no dry flour is visible.
- Pour the batter into the greased cake pan and smooth the top.
- Bake for 30-35 minutes. Check for doneness by inserting a toothpick in the center.
- Remove the cake from the oven and let it cool in the pan for about 10 minutes before transferring it to a wire rack.
- For the ganache, heat 1 cup of dark chocolate and 0.5 cups of butter until melted and smooth.
- Melt additional chocolate for the decorative nests. Pipe melted chocolate into nest shapes on parchment.
- Once the cake has cooled, pour the ganache over the top and gently place the chocolate nests filled with mini eggs atop the cake.
Leave a Reply