
As I flipped through my recipe book, a particular dessert caught my eye—Biscoff Cheesecake. The combination of creamy cheesecake with the delightful notes of Lotus Biscoff cookies creates a treat that feels like a warm hug on a plate. What’s fantastic about this recipe is its versatility: you can whip up a no-bake version for those busy weeknights or choose the baked option when you want to impress at a gathering. Both versions promise a rich, indulgent experience without overwhelming prep time. Plus, the blend of textures—a crunchy cookie crust with a velvety filling—makes each bite simply irresistible. Are you ready to dive into this creamy indulgence? Let’s get started!
Why is Biscoff Cheesecake a Must-Try?
Decadent Delight: Every slice of Biscoff cheesecake delivers a creamy, indulgent flavor that will have your taste buds dancing with joy.
Versatile Options: Whether you prefer the convenience of a no-bake version or the richness of a baked version, this recipe has you covered for any occasion.
Unique Flavor Fusion: The spiced notes of Lotus Biscoff cookies elevate the classic cheesecake experience to something truly special—a true standout at any dessert table!
Effortless Preparation: With simple ingredients and straightforward steps, you’ll have this dessert ready in no time, freeing you up to enjoy quality moments with friends and family.
Crowd-Pleasing Treat: Impress your guests without the stress—this cheesecake guarantees “wow” moments, making it perfect for gatherings or special celebrations. You can also explore a delightful twist with our White Chocolate Cheesecake.
Biscoff Cheesecake Ingredients
For the Crust
• Lotus Biscoff Cookies – Use these for a crunchy base that adds a sweet, spiced flavor; gluten-free cookies can be a great substitute.
• Unsalted Butter – Binds the cookie crumbs for the crust; coconut oil works well for a dairy-free alternative.
For the Filling
• Cream Cheese – Provides the cheesecake’s rich and creamy texture; opt for dairy-free cream cheese for a lighter version.
• Granulated Sugar – Sweetens the filling; consider using a sugar substitute to make it lower in sugar.
• Eggs (for Baked version) – This ingredient adds necessary structure; simply omit for the no-bake version.
• Heavy Cream (for No-Bake version) – Adds richness and helps the filling set; use coconut cream for a dairy-free substitute.
• Lotus Biscoff Spread – Enhances the Biscoff flavor in the filling; don’t forget to drizzle some on top for extra indulgence!
• Vanilla Extract – Adds depth and enhances the flavor.
• All-Purpose Flour (for Baked version) – Helps bind the filling; feel free to swap with cornstarch for gluten-free needs.
For the Topping
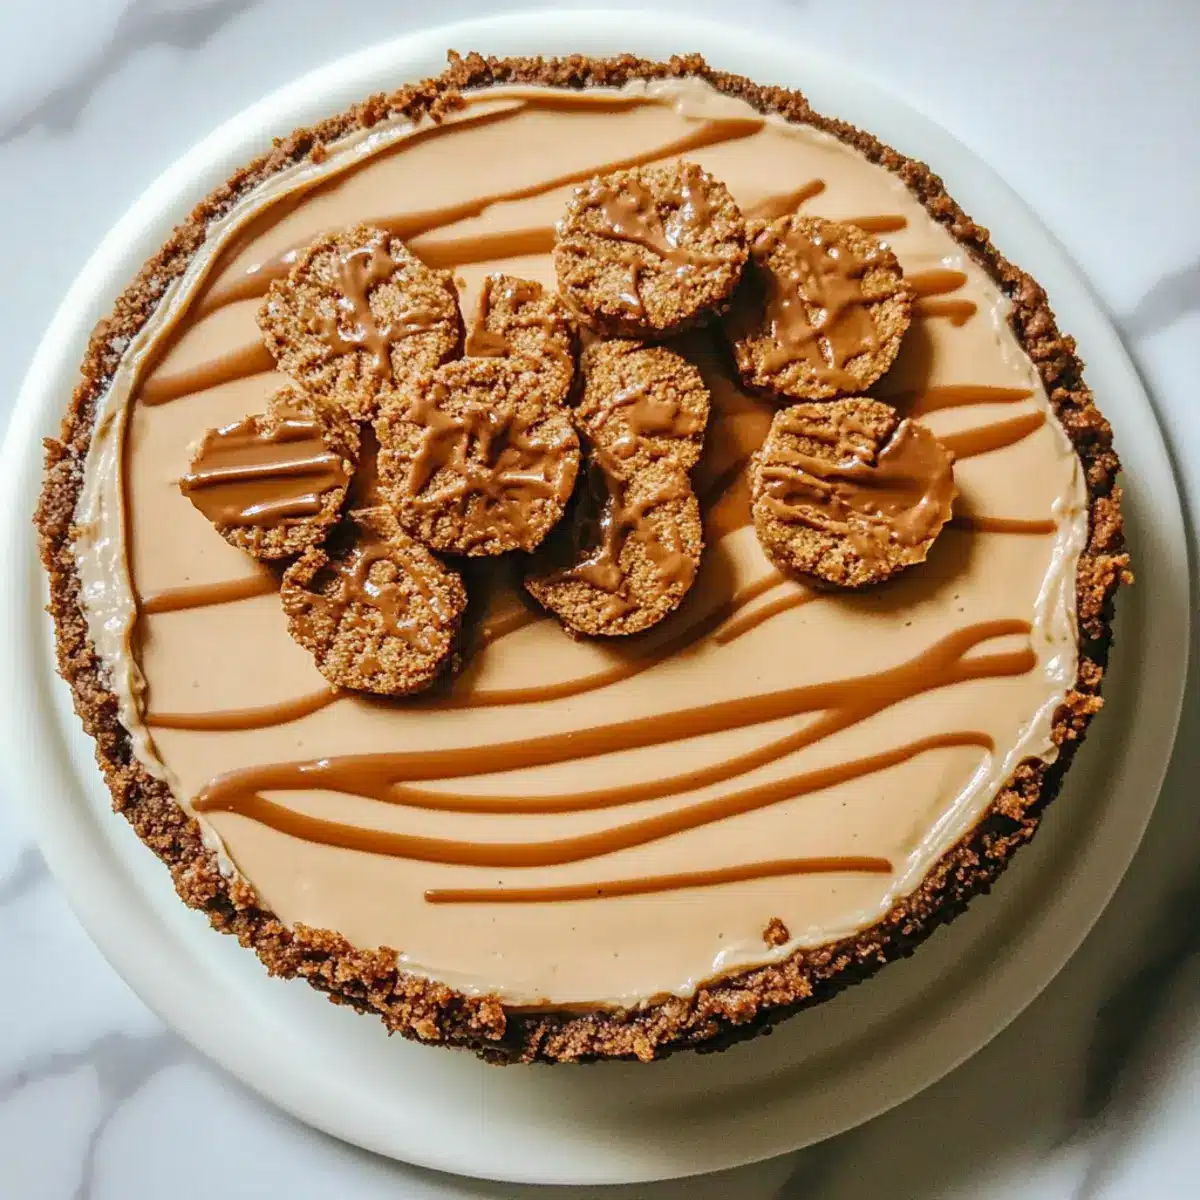
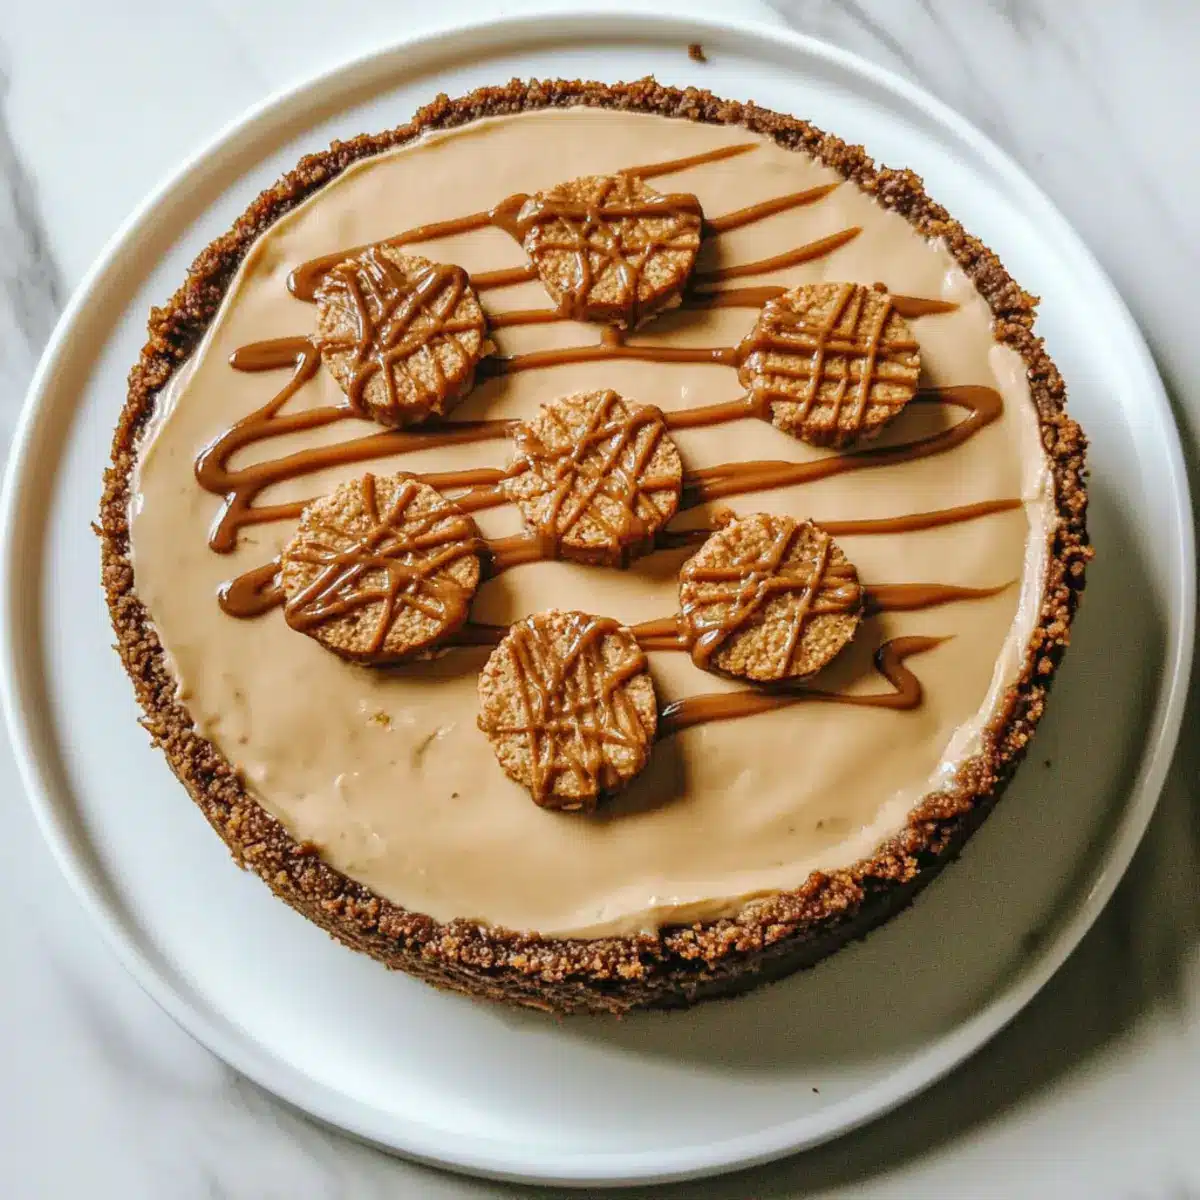
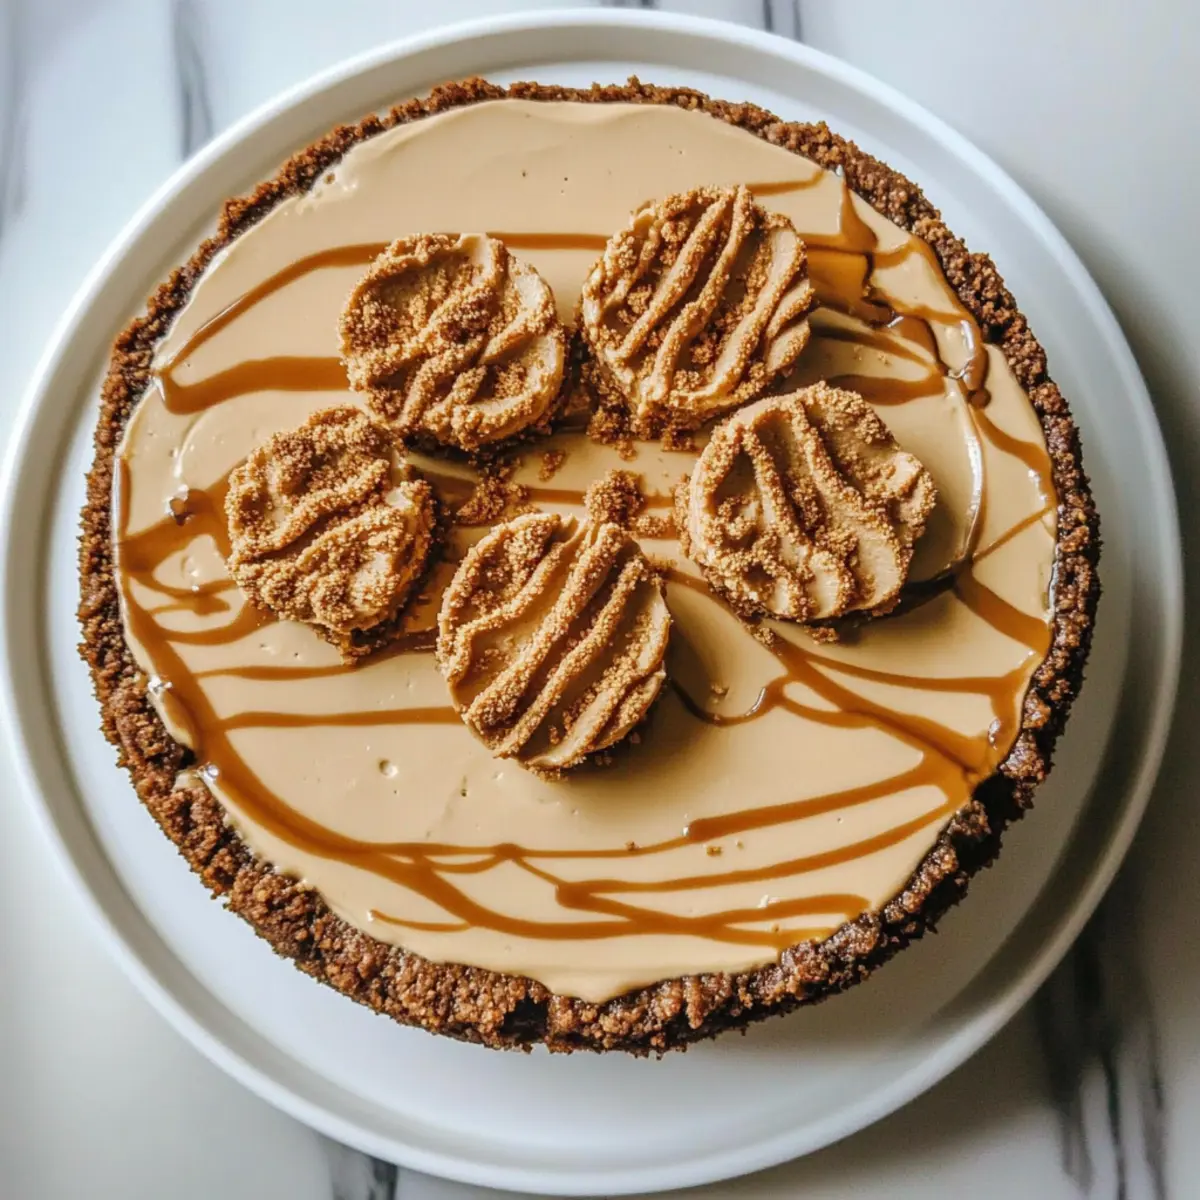
• Melted Lotus Biscoff Spread – Drizzle it over the cheesecake for a beautiful finish.
• Crushed Biscoff Cookies – Garnish with these for added crunch and an appealing look.
Step‑by‑Step Instructions for Biscoff Cheesecake
Step 1: Prepare the Crust
Begin by preheating your oven to 325°F (163°C) if you’re making the baked version. In a food processor, crush the Lotus Biscoff cookies into fine crumbs. Melt the unsalted butter, then combine it with the cookie crumbs in a mixing bowl. Press this mixture into the bottom of a 9-inch springform pan evenly to create a sturdy crust. Bake for about 10 minutes until set and fragrant, then allow it to cool completely.
Step 2: Make the Filling
In a large mixing bowl, beat the cream cheese and granulated sugar together until smooth and creamy, about 3-4 minutes. Add the melted Lotus Biscoff spread and vanilla extract, mixing until fully incorporated. This Biscoff cheesecake filling should be smooth and free of lumps, a beautiful creamy texture that will be deliciously indulgent. If you are preparing the no-bake version, skip to Step 4.
Step 3: Combine Ingredients for Baked Version
For the baked Biscoff cheesecake, gently fold in the eggs one at a time, mixing just until combined. Then, sift in the all-purpose flour while folding, being careful not to overmix. You want to incorporate the ingredients without introducing too much air, which can cause cracks during baking. The mixture should be creamy, thick, and fully combined, ready for baking.
Step 4: Bake or Chill
Pour the Biscoff cheesecake filling over your cooled crust, smoothing the top with a spatula. For the baked version, bake in the preheated oven for 50-60 minutes, until the edges are set but the center is still slightly jiggly. For the no-bake option, pour the filling directly onto the crust and cover it with plastic wrap. Refrigerate for at least 6 hours, or overnight for the best results.
Step 5: Add Topping
Once chilled or baked, carefully remove the Biscoff cheesecake from the springform pan. For an elegant finish, drizzle warm melted Lotus Biscoff spread over the top, letting it cascade beautifully. Sprinkle on additional crushed Biscoff cookies for added texture and visual appeal. Your Biscoff cheesecake is now ready to impress!

What to Serve with Biscoff Cheesecake?
Elevate your dessert experience and create a delightful meal around this creamy, indulgent treat that the whole family will love.
-
Fresh Berries: Their tartness and acidity beautifully contrast the rich cheesecake, adding a pop of color on the plate.
-
Whipped Cream: A light, airy topping that complements the dense filling, enhancing that creamy texture with every bite.
-
Chocolate Sauce: Drizzling warm chocolate sauce adds a decadent layer of flavor that pairs spectacularly with the spiced Biscoff notes.
-
Coffee or Espresso: The robust flavor of coffee brings out the deep flavors of the cheesecake, making for a perfect after-dinner pairing.
-
Nutty Caramel Sauce: A drizzle of homemade or store-bought caramel infused with nuts adds a crunchy sweetness that balances the smooth creaminess of the cheesecake.
-
Ice Cream: A scoop of vanilla bean or salted caramel ice cream creates a delightful contrast in temperature and flavor, making every bite unforgettable.
Indulge yourself by pairing these elements for a complete and delightful meal that celebrates the memorable charm of your Biscoff cheesecake!
How to Store and Freeze Biscoff Cheesecake
Fridge: Keep your Biscoff cheesecake covered in plastic wrap or in an airtight container, where it will stay fresh for up to 3 days.
Freezer: For longer storage, wrap the cheesecake tightly in plastic wrap and then in aluminum foil. It can be frozen for up to 2 months; thaw overnight in the fridge before serving.
Reheating: If you’ve frozen slices, let them thaw in the refrigerator for a few hours before enjoying. You can also gently heat in the microwave for a few seconds if preferred warm.
Biscoff Cheesecake Variations
Feel free to get creative and personalize your Biscoff cheesecake experience with these delicious twists!
- Dairy-Free: Swap cream cheese with dairy-free cream cheese and use coconut cream for richness.
- Gluten-Free: Replace Lotus Biscoff cookies with gluten-free cookies for a delightful, gluten-free option.
- Chocolate Lovers: Add melted dark chocolate to the filling for an extra layer of indulgence.
- Mini Versions: Pour the filling into muffin tins for individual cheesecakes; they’re perfect for parties!
- Spiced Kick: Add a dash of cinnamon or nutmeg to enhance the warm spice profile of the Biscoff flavors.
- Flavor Infusion: Infuse your filling with a splash of caramel extract for a sweet, buttery layer of flavor.
- Crispy Crust: Combine almond flour with your cookie crumbs for a nutty texture that elevates the crust.
- Heavenly Toppings: Top with fresh fruit like strawberries or raspberries for a refreshing contrast to the creaminess.
For more delightful cheesecake inspirations, don’t forget to check out our velvety White Chocolate Cheesecake and let the flavors mingle!
Make Ahead Options
These Biscoff Cheesecakes are a fabulous option for meal prep enthusiasts! You can prepare the crust and filling up to 24 hours in advance, allowing flavors to meld beautifully while saving you time. For the crust, crush the Biscoff cookies and mix with melted butter, then press it into your springform pan. Next, prepare the filling (either for the baked or no-bake version) and refrigerate it separately. To maintain quality, keep the filling covered in the fridge to prevent it from absorbing odors. When you’re ready to serve, simply pour the filling over the crust and bake or chill as directed—resulting in a freshly made Biscoff Cheesecake that impresses, all without the last-minute rush!
Expert Tips for Biscoff Cheesecake
-
Room Temperature Cream Cheese: Ensure your cream cheese is at room temperature to avoid lumps in the filling; chilled cream cheese can lead to a grainy texture.
-
Fold, Don’t Stir: When adding eggs for the baked version, gently fold them in to prevent overmixing, which can create cracks during baking.
-
Water Bath Magic: For a perfectly smooth baked cheesecake, use a water bath; it helps maintain even heat and prevents the cheesecake from cracking.
-
Chill Time Counts: If making the no-bake version, allow it to chill for at least 6 hours—or overnight for best results—so it sets properly.
-
Garnishing Elegance: For a stunning presentation, drizzle extra melted Biscoff spread on top and sprinkle with crushed cookies right before serving, adding both flavor and crunch.
Biscoff Cheesecake Recipe FAQs
How do I choose ripe ingredients for my Biscoff cheesecake?
Absolutely! For the best flavor and texture in your Biscoff cheesecake, ensure your cream cheese is at room temperature before mixing. This helps avoid lumps in your filling. When choosing Lotus Biscoff cookies, look for ones without any dark spots or damage, as these can impact the flavor and texture of your crust.
What is the best way to store Biscoff cheesecake?
Very good question! Store your Biscoff cheesecake covered in plastic wrap or in an airtight container in the refrigerator, where it will remain fresh for about 3 to 4 days. If you plan to make it ahead for a gathering, you can also prepare it 2 to 3 days in advance, allowing the flavors to meld wonderfully.
Can I freeze my Biscoff cheesecake, and how do I do that?
Yes, you can! To freeze your cheesecake, wrap it tightly in plastic wrap, then in aluminum foil to protect it from freezer burn. It can be frozen for up to 3 months. When you’re ready to enjoy it, simply remove it from the freezer and leave it to thaw overnight in the fridge before serving. Make sure to drizzle some fresh melted Biscoff spread on top just before serving for that extra flair!
What should I do if my cheesecake cracks while baking?
Don’t worry; it happens to the best of us! To prevent cracks, ensure that you gently fold in the eggs rather than stirring, as overmixing introduces too much air. Additionally, use a water bath while baking; place your springform pan in a larger baking dish filled with water. This creates a humid environment that keeps your cheesecake moist and reduces temperature fluctuations.
Is Biscoff cheesecake safe for people with allergies?
Great consideration! This cheesecake contains common allergens, including dairy (cream cheese and butter) and gluten (Biscoff cookies) in its traditional form. For a gluten-free version, substitute the cookies with gluten-free ones. If you’re looking for a dairy-free option, choose dairy-free cream cheese and coconut oil instead of butter. Always check ingredient labels to ensure they meet your dietary requirements.
Irresistibly Creamy Biscoff Cheesecake for Delicious Indulgence
Ingredients
Equipment
Method
- Preheat your oven to 325°F (163°C) if you're making the baked version.
- In a food processor, crush the Lotus Biscoff cookies into fine crumbs.
- Melt the unsalted butter, then combine it with the cookie crumbs in a mixing bowl.
- Press this mixture into the bottom of a 9-inch springform pan evenly to create a sturdy crust.
- Bake for about 10 minutes until set and fragrant, then allow it to cool completely.
- In a large mixing bowl, beat the cream cheese and granulated sugar together until smooth and creamy, about 3-4 minutes.
- Add the melted Lotus Biscoff spread and vanilla extract, mixing until fully incorporated.
- For the baked version, gently fold in the eggs one at a time, mixing just until combined.
- Then, sift in the all-purpose flour while folding, being careful not to overmix.
- Pour the Biscoff cheesecake filling over your cooled crust, smoothing the top with a spatula.
- For the baked version, bake in the preheated oven for 50-60 minutes, until the edges are set but the center is still slightly jiggly.
- For the no-bake option, pour the filling directly onto the crust and cover it with plastic wrap. Refrigerate for at least 6 hours, or overnight for best results.
- Once chilled or baked, carefully remove the Biscoff cheesecake from the springform pan.
- Drizzle warm melted Lotus Biscoff spread over the top, letting it cascade beautifully.
- Sprinkle on additional crushed Biscoff cookies for added texture and visual appeal.
Leave a Reply